Creating a new object database
As this is a tutorial, it's meant to be gone through in order, as each section builds on earlier sections.
1. New Website
2. Publishing a Page
3. Editing a Page
4. New Page
5. Changing Colors
6. Inheritance
7. Publishing a Table
8. More Directives
9. Managing Images
10. Background Images
11. Editing Templates
12. Subtables
13. Link Management: the Glossary
14. The GlossSub Macro
15. Rebuilding the Glossary
16. Adding Glossary Entries
17. Includes
18. NextPrev Links
19. Writing in Outlines
20. Using Outline Renderers
21. Publishing to a Server
22. Website Tutorial Conclusion
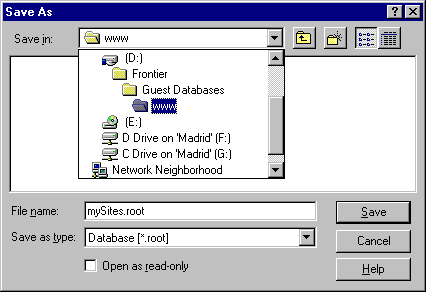
To create your first website, first create a new database. From the File Menu, choose New->Database. Give it the name mySites.root and store it in the www folder that's in Frontier's Guest Databases folder.

Creating a new object database
|
What is a guest database? Frontier stores websites -- and data and scripts -- in object databases. The main database, which contains Frontier's built-in functions, is called Frontier.root, and it's in the same folder as the Frontier application. Guest databases are databases other than Frontier.root. Guest databases are where you store your websites. Frontier databases end with a .root file extension -- and are sometimes called "roots." |
The new, empty guest database will look something like this:
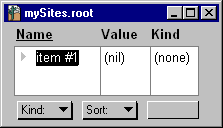
New, empty guest database
To create a new, empty website, use the New Website... command that's in the Web menu.
The New Website... command first prompts you for the name of your website. For this tutorial, type the name "tutorial."
A new, empty Frontier website table will be created in mySites.root. It will look something like this:
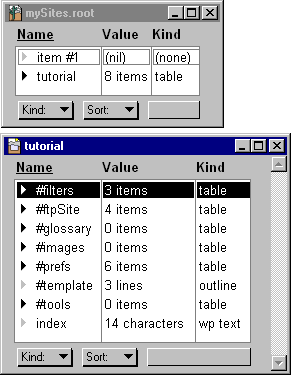
New, empty website
Note that the website opened in a new window named "tutorial." You also see a "tutorial" item in mySites.root.
This is because object databases are hierarchical: they contain tables, which can contain other tables. Databases and tables also contain text windows, outlines, scripts, and various types of data.
Databases are similar to your hard drive: instead of folders, databases contain tables. Instead of files, tables contain various types of data. The view is similar to the Windows Explorer's outline view or the Macintosh Finder's outline view. (As you'll see, outlines and hierarchy are very important in Frontier.)
So: the window named "tutorial" is another view from inside mySites.root. You can verify this. First, close the "tutorial" window by clicking on the go-away box.
Then double-click on the triangle to the left of the "tutorial" item in the mySites.root window. You may need to re-size the window after. It should look something like this:
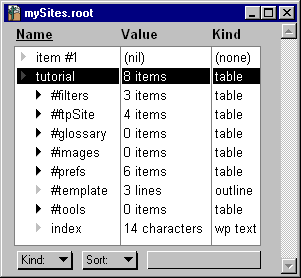
Tutorial website expanded
|
Tips A keyboard shortcut for expanding and collapsing tables -- or any outline node -- is to use the + and - keys on the numeric keypad. If you want to open a table up in a new window, double-click inside the Value column. |
You don't need the "item #1" that's in the database. To delete it, click once on the triangle to the left of "item #1" and press the delete key or choose Clear from the Edit menu.
Now's a good time to save your database. Type ctrl-s (cmd-s on Macintosh) to save the database. Or choose Save Database from the File menu.
|
Note On Windows, most keyboard shortcuts use the control key. On Macintosh, most keyboard shortcuts use the command key. In this guide, we'll refer to the control key most of the time. Macintosh users should read this as the command key, unless otherwise noted. |
To publish your first page, select the index item in the tutorial table by single-clicking on the triangle to the left of it.
Then choose Publish Page from the Web menu.
The page will open in your web browser, and it will look something like this:
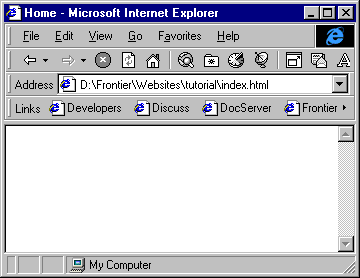
Empty home page
The page is -- mostly -- empty. If you view source, you will see that Frontier did provide some default values for you. (You'll learn more about this when you learn about templates.)

Empty page source
A default top and bottom of the page were provided, with a title -- "Home" -- and values for background and link colors.
To add some content to the page, open "index" up in a new window. To do so, double-click on the triangle to the left of the "index" item. It's kind is wp text, which means "index" is a text editing window.
|
Tip You can open up wp text and other types of editing windows by selecting the item and typing ctrl-Enter. But note -- that's the numeric keypad Enter key, not the main Enter key. (On Macs the main Enter key is the Return key.) If you don't have a numeric keypad and you're using Windows, use F2 instead of the Enter key. |
The editing window will look something like this:
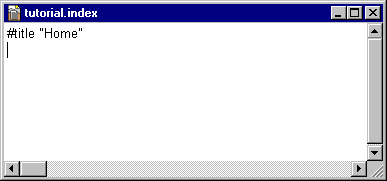
Index open for editing
You can see immediately where Frontier got the title for the page -- in the editing window is the line #title "Home" -- which is how to specify the title of a page.
The #title is a directive. Anything starting with # is a directive. A directive is something that affects the contents of a page, but isn't a part of the body of a page. The most common directive is the #title directive. (Every page should have a title.) In web pages, directives should appear at the top, one per line.
Change the title to "Tutorial Home Page." Then, underneath that line, on a new line, type:
This is my first Frontier web page!
The wp text window will look like this:
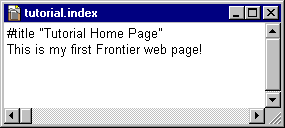
Editing a web page
Now publish the page. It will look something like this in your browser:
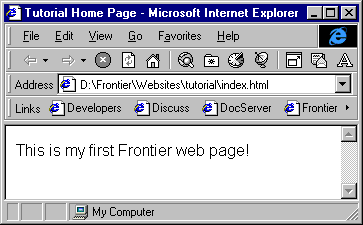
First Frontier web page
Note the browser's title bar -- it picked up the changed title, it now reads "Tutorial Home Page." Note that the contents of "index" are now the contents of the published, or rendered, web page.
|
What is rendering? To render a page means to take its contents, directives, and macros and flow it through its template to generate a finished web page. The menu command Publish Page can also be thought of as the Render Page command. You'll read more about macros and templates further on in this tutorial. |
Notice that Frontier has an HTML menu. You can include HTML in your page by typing it or using the shortcuts in the HTML menu.
To make your line of text bold, select it and choose Style->Bold from the HTML menu. Then publish your page again -- this time the contents will be bold.
To create a new page, select an item, any item, in the tutorial table. Then choose New Page from the Web menu. When prompted for the title of the new page, type "Page Two."
A new page will be created in the same table as the index page. The name of the item will be "pageTwo," and the page will open for editing, with a #title directive already in the page.
To add content to the page, simply type below the directive, as with the index page. To publish the page, choose the Publish Page command.
Suppose you want to change the background and text colors for all the pages in your website. Right now we've built just a small, two-page website. But a website might have hundreds or many thousands of pages.
In Frontier, to change the background color of a page, you set the #bgcolor directive to the color you want.
Here's one way: in the tutorial table, expand the table called #prefs. Every item in this table is a directive -- even though the item names don't start with a #, the parent table's name -- #prefs -- does start with a #. This is a table of directives.
The tutorial table with the #prefs table expanded looks something like this:
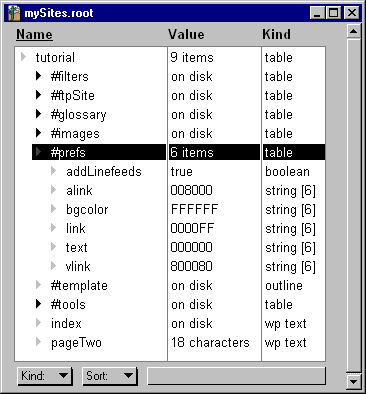
The #prefs table
To change the background color, click inside the Value column next to bgcolor. Let's choose a color like black: type "black" in the Value column, then hit the keypad Enter key (or F2).
The value is replaced by 000000, which is the representation for black.
If you wanted to type in a hexadecimal value, you could: try typing "000000" instead -- but include the quotes around what you type. This will prevent Frontier from collapsing the six zeros into one zero.
Now try publishing one of your pages: it will have a black background and you won't be able to read the text. So change the value for text in the #prefs table -- set it to white.
|
Tip You don't have to have a page open for editing in front of you to publish it. You can select the item in the table, by clicking once on the triangle to the left, then choose Publish Page. |
Now your page has a black background and white text. If you publish both pages, you'll see that both have black backgrounds and white text. The #bgcolor directive affects all the pages.
Of course, you might want different pages to have different background colors. Say that white text on black is fine for most of your site, but for Page Two you want black text on white.
Open Page Two for editing, and add two directives to make it look like this:
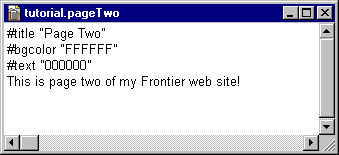
Page Two with two new directives
Now choose Publish Page. Page two will have black text on a white background.
This is a key concept in Frontier's website framework: directives are inherited, and can be over-ridden.
In the example above, the setting for the entire website was a black background with white text. Both the home page and Page Two inherit those settings.
But: Page Two over-rides those settings by including directives in the page itself.
As you'll see as you work with Frontier, inheritance works at the table level too. If Page Two were in a subtable of the tutorial website, you could set a #bgcolor directive at the table level that would over-ride the setting in the #prefs table at the top level of the website. This way all the pages in a table can over-ride the settings at the top level.
You can publish an entire website at once with the Publish Table... command. Select one of the pages, then choose Publish Table... from the Web menu.
A dialog will ask you to confirm you want to do this: it will ask if you want to 'Publish all web objects in "tutorial"?' Click OK, and both the home page and Page Two will be rendered to disk.
When it's finished, the home page will be displayed in the browser.
If your website has subtables, then you can publish those tables separately by selecting a page in a subtable and choosing Publish Page... If you select a page at the top level of your site, all pages in all subtables will be published.
Aside from the directives you see in the #prefs table, there are plenty more. You don't have to set all of them: plain default values will be used for the ones you don't set. (For reference: a list of directives appears in the Frontier site: http://frontier.userland.com/)
However, there are three directives that you almost definitely want to set to true, even though the default is false: activeURLs, autoParagraphs, and clayCompatibility.
Setting activeURLs to true means that any time you type a URL, such http://docserver.userland.com/, Frontier will automatically make this a link, as in http://docserver.userland.com/
It will do the same for email addresses. If you type webmaster@userland.com, Frontier will expand this into a mailto: link, as in webmaster@userland.com.
Setting autoParagraphs to true means that any time you leave a blank line -- two returns in a row -- Frontier will insert a <p> tag for you.
Setting clayCompatibility to true means that any time Frontier sees ***, then the rest of the line will be bold. It also means that any line that begins with --- will be replaced by an <hr> tag. ("Clay" refers to a software product, Clay Basket, that's one the precursors to Frontier's website framework.)
Here's what the #prefs table looks like with these directives added:
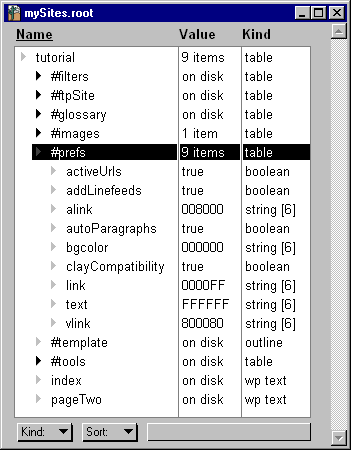
#prefs table with additional directives
To add a directive to the #prefs table, first select any item in the #prefs table. Then hit the Return key -- on Windows keyboards, that's the main Enter key, not the keypad Enter key.
A new item, usually called item #1, will appear, with the name selected for editing. It's value will be (nil) and it's kind will be (none).
Type the name -- try typing "autoParagraphs" -- then hit Tab to move the cursor to the Value column. The word (nil) will be selected: type "true" to replace the word (nil).
Then hit the keypad Enter key or F2. This causes changes from Edit mode to Selection Mode. Hit Enter or F2 several times in a row to see how this works.
When you're in Edit mode you can edit the name of an item and its value. When you're in Selection mode you can create a new item, delete an item -- or move an item by dragging the triangle to the left of the item.
The #images table is a special table for holding images you use in your web pages. The #images table of the tutorial website is empty -- but you can add images to it via the Web menus's Load Image File... command.
For this part of the tutorial, if you have a GIF or JPEG handy, use that, otherwise save one of the GIFs on this page to your hard drive. (You can scroll up a little to save one of the screen shots.)
First, select the #images table in the tutorial table. Then choose Load Image File... from the Web menu. A dialog box will ask to choose an image file from your hard drive. Click the Open button once you've selected the image.
The image is read into Frontier and stored in the #images table in your website. It will look something like this:
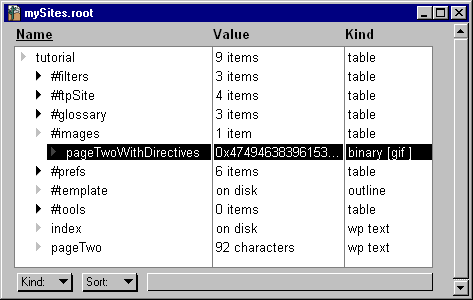
#images table with a new image
Note that the extension has been stripped from the name. Also note that it's value looks like gibberish -- it's binary data, the same as what was stored on disk.
To use the image in a page, edit Page Two, and add two lines at the bottom that read:
<p>

{imageRef ("pageTwoWithDirectives")}
Substitute "pageTwoWithDirectives" for whatever the name of your image is.
Now publish your page -- it will look something like this, though perhaps with a different graphic:
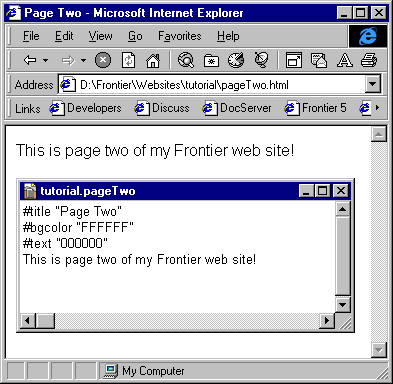
Page Two with image
This is the first time you've used a macro. A macro is not HTML -- it's a Frontier script that generates HTML. Macros appear between curly braces, between { and }.
Your macro calls another macro in Frontier called imageRef. Note that both the curly-braces script in the page and the script it calls are known as macros.
The job of imageRef is to take the name of an image and build an <img src=...> tag. It also writes the image to disk for you, and calculates the height and width of the image so you don't have to.
Importantly, the imageRef macro generates a relative link to the image. You'll see that Frontier tends to generate relative links over absolute URLs so that it's easier to make your site portable -- it can be moved from one machine to another without having to rebuild all the links.
If you view the source of your rendered page, you'll see that the height and width have been added for you, and the appropriate extension -- .gif or .jpg -- has been added also.
You can also tell the imageRef macro additional information about your macro. If you want to add an alt attribute, you'd write something like this in your page:
{imageRef ("pageTwoWithDirectives", "Page Two")}
If you wanted to set an hspace of 5, a border of 2, and the width to 100, you'd write it like this:
{imageRef ("pageTwoWithDirectives", hspace:2, border:2, width:100)}
You can make an image a link to somewhere else, by putting HTML around the imageRef macro, like so:
<a href="http://www.scriptingnews.com/">{imageRef ("pageTwoWithDirectives")}</a>
Then if you click on the image in the rendered page, your browser would open http://www.scriptingnews.com/
If you want your website to have a background image, load your background image the same way you did above, using the Load Image File... command.
Then add an entry to your #prefs table called background. (See the More Directives section for a reminder on how to add entries to a table.)
Its value should be the name of the background image, but minus any .gif or .jpg suffix -- just the same as you specified the name using the imageRef macro.
Now your website will use that image as the background for all its pages.
Should you want to specify that a certain page should have no background image or a different background image, you can add a #background directive to the page itself -- this will over-ride the setting in the prefs table. For no background, use a line like this:
#background ""
For a different background, use a line like this:
#background "myOtherBackgroundGif"
Remember that directives in a page go at the top, start with a #, and each directive must be on its own line.
If for any reason you'd rather not store your background image in Frontier -- say your background image is actually on a server you don't have access to -- you can set the value of the #background directive to a full URL, as in:
#background "http://www.scripting.com/frontier5/images/bg4.gif"
One of the key benefits of Frontier is that websites use templates. Templates specify the outer contents of the page, while what's in the actual page in Frontier is the inner contents.
This way you can specify the look of an entire site very easily. And you can change the look just by changing the template and re-publishing site. (It's just two steps: edit your template, then choose the Publish Table... command to re-publish your entire site.)
Edit the #template in the tutorial website for editing (double-click on its triangle):
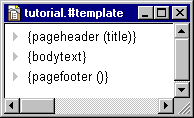
#template open for editing
This is a very plain template. This template is also an outline.
Outlines are very similar to object database windows: they expand and collapse, you can drag items by dragging the triangle, you switch between Edit and Selection modes the same way (by hitting the keypad Enter key or F2). You'll find out later that scripts and menus are also a type of outline: but that will wait until the scripting tutorial, later in this guide.
The first line of this template calls a macro, the pageHeader macro. (Note the curly braces.)
{pageheader (title)}
The pageHeader macro takes care of adding the standard heading -- the <html>, <head>, <title>, and <body> tags. It places your page title between <title> and </title>. It constructs the <body> tag according to your bgcolor, background, text, and links directives.
The second line of this template is something pretty much every template has: this is where the body text -- the actual content of the page -- is placed.
{bodytext}
The last line of the template -- {pagefooter ()} inserts the closing </body> and </html> tags at the bottom of the page. This is the job of the pageFooter macro.
Templates can be as simple as this -- but they can also be very complex. For starters, you might want a certain graphic to appear at the top of every page, you might want a navigation bar on the right side of every page. And so on.
Templates are just HTML and Frontier macros.
To get an idea of what a template can do, edit the tutorial template to look like the below screen shot. (Remember that you can drag items by their triangles to re-organize the outline. You can also use the Outliner menu.)
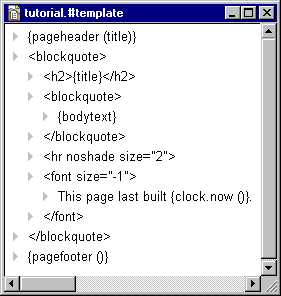
Tutorial Template edited
(You might also want to change your bgcolor and text directives back to white and black, respectively.)
Now publish the tutorial home page. Your browser will look something like this:
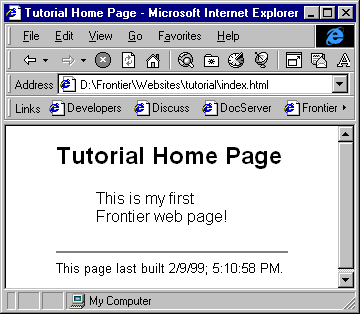
Tutorial home page in browser
Notice how the template surrounds the contents of the page. If you publish Page Two, you'll see a similar thing: the template surrounds the contents of Page Two.
|
Why use outlines for templates? Many Frontier users prefer to write templates in outlines, even though you can write them as wp text objects. Often, your template is where most of your HTML is. The actual page contents tend to contain little HTML. They often contain text, blank lines between paragraphs, perhaps some macros such as imageRef, some light HTML such as bold tags -- but most of the HTML is in the template. Since HTML is a structured language, and outlines are well-suited for showing structure, outlines are often used for templates. For instance, note in the screen shot of the tutorial template how the elements under the blockquote tag are indented. You don't have to do that -- but if you do, it makes it easier to see the structure. Tips You can collapse the outline down to see the main points -- choose Collapse Everything from the Outliner menu. And you can expand the entire outline to see all the details -- choose Expand Everything from the Outliner menu. |
The edited template above resembles the original template -- it's just got more HTML and a couple new macros.
Notice that the pageHeader macro is still at the top and the pageFooter macro is still at the bottom. The bodytext macro appears where the contents of the page goes.
This template also uses the {title} macro -- this is replaced by the title of the page, as determined by the #title directive in the page.
Also notice {clock.now ()} macro -- this is replaced by the date and time at which the page was published. (Try publishing your page several times in a row: notice that the time at the bottom changes each time.)
|
Macros and case For most macros, it doesn't matter whether the name is in upper-case, lower-case, or any mix. For instance, typing {PAGEFOOTER ()} or {pagefooter ()} or {pAgEFootEr ()} results in the same thing. But an important exception is the bodytext macro -- it must be in all lower-case, as {bodytext}. Forgetting this is one of the most common causes of website problems: if something's not working in your website, it's one of the first things to check. |
Multiple templates
Of course, you may not wish to use one single template for an entire site. Sites can have multiple templates: templates can over-ride other templates, the inheritance works the same way as other directives. A more thorough discussion of multiple templates is outside the scope of this tutorial, but you can later read the HowTo on using multiple templates.
Remember that databases are hierarchical. They contain tables and subtables, just like folders on disk.
In fact, there is a direct correspondence between tables in your website and folders on disk. If you make a subtable, and put pages in that table, then when you publish a page in that subtable it will be rendered to a folder with the same name as the subtable.
To make a subtable in the tutorial website, select any item in the tutorial table and press the Return key. (On Windows, that's the main Enter key, not the keypad Enter key.)
Double-click on the triangle next to the new item #1. A dialog box like this will appear:
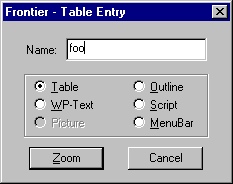
Zoom Dialog Box
Type "foo" in the Name: field to make the new table "foo." Click Zoom when you're ready to create the table.
The foo table will open in its own window: it will be empty but for an item #1. Go ahead and close that window. Note that the tutorial table contains an item called foo. It's value is 0 items and its kind is table.
Expand the foo table, then create a new wp text object inside there. Give it the name "bar."
Edit bar -- make it's #title equal to "Page Three" and add some contents: "This is a page in a subtable!"
Then publish it. Your browser will display something like this:
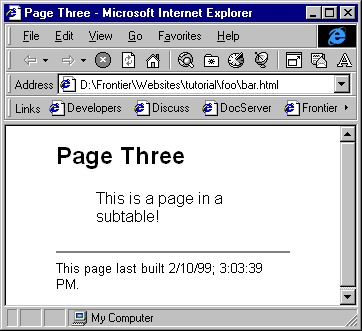
Page from a subtable
Notice the path displayed in the browser window. The first part of your path may be different, depending on where you have Frontier installed -- but the last part of the path should be the same. Note that there is a folder named "foo" that has been created. Publish Table, again
You can use the Publish Table... command to publish your entire website. Just select a page in the tutorial table and choose the menu item. All pages, even the one in the foo table, will be published.
If you want to just publish pages in just a subtable of your website, select a page in that subtable then choose the Publish Table... command.
You can try it here: select bar and choose Publish Table... Only pages in the foo table -- there's only one right now -- will be published.
Frontier pages can link to other pages as easily as enclosing the title of another page in double quotes.
For example, open up Page Two in the tutorial website, and add a line at the bottom that reads:
Return to the "Tutorial Home Page"
Now publish the page: "Tutorial Home Page" is now a link back to the home page, and the quotes are gone.
Your page should will look something like this:
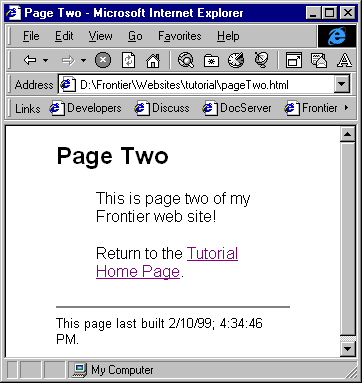
Titles in double-quotes become links
(Your page might still have an image in it, of course, from the earlier section on using imageRef, so your page will look a little different.)
If you view the source of the page, you'll see that the link is a relative link. As mentioned in the section on Images, Frontier generally builds relative links for you, so your sites are portable -- they can be moved from server to server without having to rebuild all the pages.
Link management is done through Frontier's glossary feature. This feature works by storing the title and location of every page in your site in the #glossary table. If you open up the #glossary table in the tutorial table, you'll see subtables named after the pages in your site.
The point is -- you don't have to remember what the link is, you can simply refer to a page in double-quotes to link to it, no matter where in your site that page is.
Sometimes you will want to link to a page in your site, but you don't want the visible part of the link to be the title of the page.
For instance, you might want to link to the Tutorial Home Page from Page Two, but you want the link to read: Go back to the Main Page, where Main Page is the link.
If you try to put "Main Page" in double-quotes, it won't become a link -- because there are no pages in your site named "Main Page."
The glossSub macro will help you here. Edit Page Two: remove the line that reads Return to the "Tutorial Home Page" to read:
Return to the {glossSub ("Tutorial Home Page", "Main Page")}.Now publish the page:
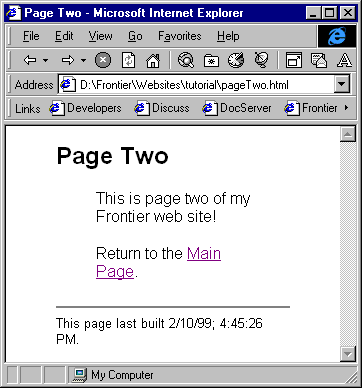
GlossSub-generated link
The glossary keeps track of your pages for you, so you can move them around and your links will still work.
When you move a page, the glossary is not updated unless you re-publish that page.
Sometimes you may re-organize your site drastically -- then your glossary will be out-of-synch until you re-publish each page.
Luckily, there's a command to rebuild your glossary: the Web menu's Build Glossary... command.
If you've made lots of changes to your site, and don't want to publish each page just to update the glossary, select your site's #glossary table and choose Build Glossary... from the Web menu.
It will first confirm that you want to rebuild the glossary, then it will do so, then it will tell you how many glossary entries were changed or added.
You can also use the glossary for links to sites outside. Say you link to Scripting News -- http://www.scripting.com/ -- often. It would be easiest to just type "Scripting News" any time you wanted to make it a link.
And then, if the URL for Scripting News changed, all you'd have to do is change the entry in your glossary and rebuild your site. All the links to Scripting News would be fixed.
To add a glossary entry for an outside site, such as Scripting News:
<a href="http://www.scripting.com/">Scripting News</a>
(Note that the glossary stores entries for outside links in a different way than it stores links to pages in your site. In-site links are stored as small tables.)
To try it out: add a line at the bottom of one of your tutorial pages that reads something like this:
Don't forget to check out "Scripting News" daily!
Then publish your page. You'll see that "Scripting News" has been replaced by a link to Scripting News.
If the URL for Scripting News changes, then all you have to do is edit that line in the glossary, rebuild your site, and then your links to Scripting News are fixed.
Note: if you've added entries by hand in this way, choosing the Build Glossary... command will not delete the entries you've added. They will remain intact.
Sometimes you'll have some HTML that's repeated in some pages, but not all pages. It wouldn't work to put this HTML in your #template -- because then it would be in all pages.
Instead, create this HTML as a separate object, either a wp-text or outline, and put it in your website's #tools table.
Say you've created an object named contactInfo in your #tools table. This object contains your contact information, and you want to include it in some of your pages, but not all.
To include it in a page, edit the source of the page (not the template), and add it like this:
{contactInfo}
When the page is built, {contactInfo} will be replaced by the contents of the contactInfo object.
Processing Macros
Note that if contactInfo contains macros, those macros will not be expanded if you include it as above.
If you want to include contactInfo and expand any macros inside contactInfo, include it this way:
{html.processMacros (string (contactInfo))}
This is how you tell Frontier to process macros inside another object, by calling html.processMacros.
It's common, especially for brochure or presentation sites, to want next and previous links in your pages.
Frontier can generate these for you. Here's how:
Build NextPrevs list
Select an object, any object, in your website.
Choose the Build NextPrev List... command from the Web menu.
When prompted for the site, type in the name of your site (as in "tutorial," the name of the website you created earlier in this tutorial).
Frontier then builds an outline listing the Frontier address of pages in your site.
The NextPrevs list may look like this:

NextPrevs Outline
It's created in an outline called #nextPrevs at the top level of your website.
Edit the NextPrevs outline
The first thing to do is edit the list. Frontier adds the full address of the pages, including the file path. Make sure that every entry includes the full file path.
Frontier also automatically generates an item for the default entry in a given subtable, even if it's not present. So you may have to remove those.
Changing the Order
As you can see, the outline lists first the index page, then page three, then page two. (Note how addresses work: names are separated by dots. tutorial.index is thus the index object in the tutorial table. tutorial.foo.pageThree is the object named pageThree in the foo table that's in the tutorial table.)
You can edit the outline by selecting a line and dragging. Thus you can get the order right, like this:

NextPrevs Edited
Why do you have to do this? If you think about it, you'll realize that Frontier can't possibly guess what order you'd like your pages to be in. So it's necessary for you to tell Frontier. linkNext and linkPrev Macros
If you want next and prev links in all your pages, first open the site template. Then use the linkNext and linkPrev macros to add the links. Like this:
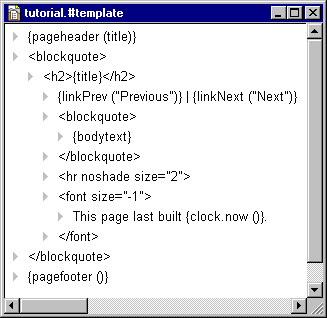
Next and Previous links in the #template
Preview the Page
Choose Page Preview from the Web menu. Your home page will look something like this:
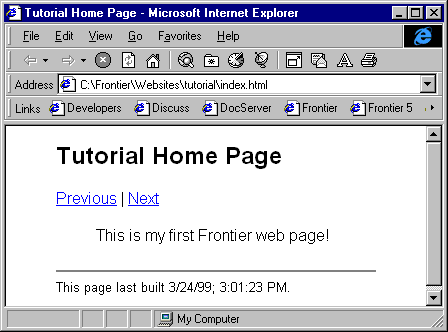
Home Page with Next and Previous links
Note what the calls to the LinkPrev and LinkNext macros do. The parameter you pass in the macro ("Previous" and "Next" in this example) become the visible link text. The link itself is to the next or previous page, depending on which macro. Using images instead of words
You may prefer that your next or previous links be images instead of words. That's easy enough. Assuming you have a next.gif and previous.gif stored in your #images table, the syntax would be:
{linkPrev (imageRef ("previous"))} | {linkNext (imageRef ("next"))}
Outline as writing environment
Outliners are great for writing web pages -- or any kind of document -- where thinking and organization are part of the composition process.
A document may be a hierarchy, with main thoughts and subordinate thoughts and details. As you write, you may find this hierarchy changes. Outlines are easy to re-organize: when you realize that a paragraph really belongs under a different heading, or when you realize the main ideas are out of order, a few strokes of the mouse and you've re-organized the page.
In Frontier, outlines are also a key to separating form from content. If you write in an outline, you can use an outline renderer to generate the HTML you want.
An outline could be displayed as an HTML table, a set of ordered lists, as plain text, as anything you want. Wrapping headlines
Frontier 6 is the first version of Frontier to include wrapping headlines. This means that lines in an outline wrap to the width of the window, and the lines can contain as much text as you want.
This feature is a key to making Frontier a great writing environment. WP-Texts, which you've used until this point, are static and hard to use in comparison. But before wrapping headlines, outlines were not much better: it was difficult to do real writing in them.
Here's an example of a page (this page, actually) being written in an outline:
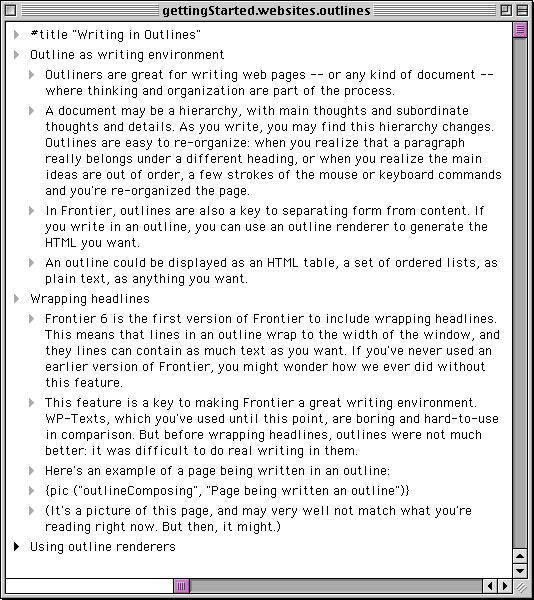
Page being written an outline
Outliner Basics
To create a new line, hit the Return key. (On Windows, that's the main Enter key, not the keypad Enter key.)
To toggle between editing a line and selecting a line, use the keypad Enter key. (On Windows, you can also use F2.)
To collapse and expand a line that has subordinate lines, double-click its triangle, or use the + and - keys on the keypad.
To move a line to the right, you can drag it with the mouse (grab the triangle to drag it), use the Tab key, or use ctrl-R. (That's cmd-R on Macintosh -- read cmd when you see ctrl.)
To move a line to the left, you can drag it, use shift-Tab, or ctrl-L.
To move a line up, drag it or use ctrl-U.
To move a line down, drag it or use ctrl-D.
To move the cursor up and down in an outline, use the arrow keys while in selection mode. The left and right arrow keys treat the outline as if it's flat, the up and down arrow keys move within the current level.
To delete a line, select it and hit the Delete key, or choose the Clear command from the Edit menu.
For more outliner commands check out the Outliner menu in Frontier's menubar.
Generating HTML from an outline
As mentioned previously, outlines are flexible in that you can use different outline renderers to generate different HTML from an outline.
These pages, for example, are written in an outline. The renderer used (at least at this writing) is the fatHeadlines renderer, which makes top-level headlines bold, inserts paragraph tags between headlines, and indents headlines that are more than two levels deep.
The #renderOutlineWith directive
To tell Frontier which renderer to use on an outline, use the #renderOutlineWith directive. Like almost all directives, you can specify this in the #prefs table, in your page, or both.
Let's create an outline in the tutorial website.
Choose New Outline from the Table menu. Give the new outline the name myOutline. On the first line, add a #title directive, as in #title "My Outline".
On the second line, specify the outline renderer, as in #renderOutlineWith "fatHeadlines".
On the third line, start typing a page. Your outline will look something like this:
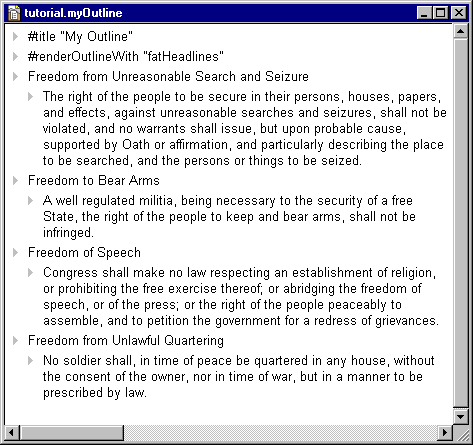
My Outline
Now choose Preview Page to see what it will look like:
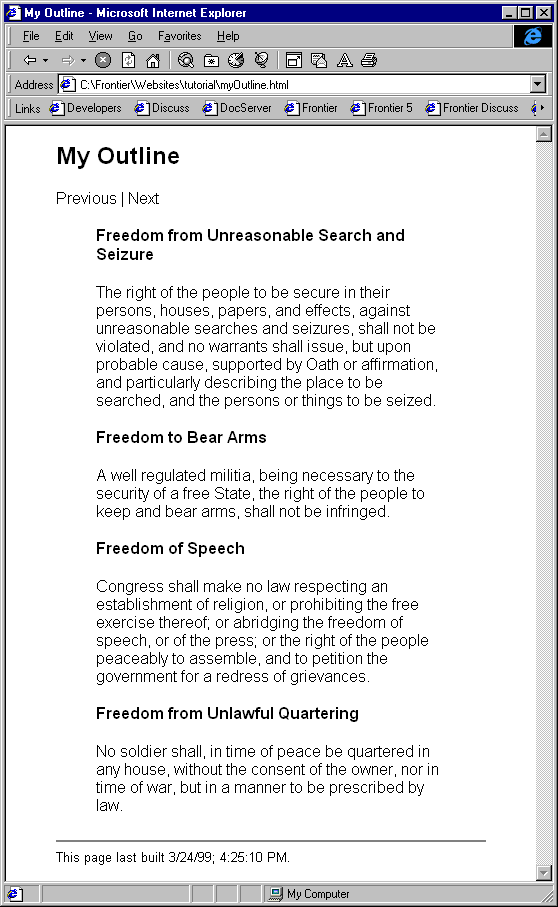
My Outline Rendered as a page
(Note: to get the Previous and Next links active in this new page, it's necessary to add its address to the #nextPrevs outline. You might want to do so now, as an exercise. Then re-render the page -- your Previous and Next links will be active.)
Other outline renderers
The best thing to do with outline renderers is to experiment. You might want to try creating an outline that's more than just two levels -- try going to three, four, and five levels.
Most outline renderers are stored in the object database at user.html.renderers. You can also store them in the #tools table of your website.
Listed below are some other outline renderers and a brief description of what they do:
twoLevelOutline
This is very much like the fatHeadlines renderer, except that top-level headlines are <h4>, and there is no indenting of headlines at any level.
prettyOutline
This outline renderer inserts a horizontal rule before each top-level headline, converts top-level headlines to all upper-case text, and numbers subordinate lines. Top-level headlines get <h3> tags while second-level headlines get <h4> tags.
Cadillac
This renderers attempts to preserve absolutely the formatting of the outline on the rendered page. The rendered page looks very much like the outline in Frontier.
JustText
This is the simplest of all outlines -- it just gets the text of the outline, without doing any kind of special rendering at all.
Default renderer
If you don't specify any renderer at all, then the page is formatted as a set of nested unordered lists. The final appearance resembles the outline in Frontier, with similar indenting.
Preview Page and Publish Page
If you just want to see how a page looks, without sending it to the server, use the Preview Page command. This just writes the page to your local hard drive, usually in the Websites folder that's in the Frontier folder.
Use Publish Page when you're ready to send the page to the server.
The #ftpSite table
How does Frontier know how to get the pages actually on your server?
The settings for this -- where and how the pages should get where they're going -- are in your site's #ftpSite table. You might want to open yours now.
Publishing to the file system
The simplest method is to publish to the file system. You can then manually upload pages to a server. Or perhaps your server is accessible as a network volume.
To publish to the file system, your #ftpSite table needs to contain:
Publishing via FTP
On Macintosh, Frontier can automatically upload your pages and images via FTP. It uses a helper application, usually Fetch or Anarchie, to do the uploading.
On Windows, you'll need to download extra software, which you can get from Frontier developer Alan German on this page: http://www.erols.com/asg/user/html/fileWriters/ftp.html
Your #ftpSite settings should look like this:
Other methods
There are other ways one might get pages to a server -- the two above are simply the most common. You can, for instance, publish directly to an object database, or publish via XML-RPC. Check out the Frontier site, especially the HowTos, for more information.
Publishing from guest databases
Though it's outside the scope of this tutorial, you can serve Frontier websites directly from a guest database, when Frontier is running either as a webserver or behind a server such as WebSTAR or IIS. Once again, see the Frontier site for more information.
By now you've learned the basics of creating and maintaining websites in Frontier.
You may have questions, such as "How do I embed JavaScript in my pages?" or "How do I add meta tags?" or "Can Frontier generate client-side image maps?" Check out the HowTos at the Frontier site -- http://frontier.userland.com/ -- for answers to these and other questions.
Writing Scripts
The next tutorial is about writing scripts. There's lots more you can do with Frontier's website framework if you learn some scripting. You can write your own macros, write page filters, and write your own outline renderers.