Frontier and Manila Server Admin
1. Hosting Preferences
2. Web Server Q&A
3. Control Panel
4. Control Panel Q&A
5. How to Get Updates
6. How to Create a Site List Page
7. Moving the Create-a-Manila-Site Form
8. Home Page Updates and Most Read Sites
9. How to Change the URL of a Site
10. How to Move a Manila Website
11. How to Configure Manila Site Downloads
12. How to Manage Themes
13. How to Configure Gems
14. How to Make a Create-a-Manila-Site Form
15. How to Set Up Additional Hosting Sites
16. How to Enable the Manila SOAP Interface
17. How to Enable Soap Server
18. Changing the Text for New Sites
19. How to Share a Membership Group
20. How to Flip the Manila Sites Database
21. How to Log to a Text File
22. Performance Tips
23. How to Create and Run a Script
24. Serving Root Files Whole
25. user.webserver
26. How to Set Up a Search Engine Server
27. How to Set Up a Search Engine for Manila Sites
1. Hosting Preferences
Overview
When you install Frontier 6.2, your hosting preferences for creating new sites are set for you.
New sites are created as sub-sites. In other words, they're created underneath a top-level site, at URLs like http://myserver.com/siteName/.
The top-level domain name is whatever you typed in when you installed Frontier via the on-line wizard.
And, by default, anybody can create new websites on your system.
You can change all these preferences via the Hosting page on the Control Panel.
Three settings
There are three hosting settings:
1. You can create sub-sites or top-level sites.
2. You can specify the base domain.
3. You can specify who can create new sites.
Changing where sites are created
If you want top-level sites -- sites of the form siteName.myserver.com -- then use the popup menu to switch to top-level sites.
Two of UserLand's services -- EditThisPage.Com and Weblogs.Com -- work this way.
Important note: top-level sites won't work unless you have a * DNS mapping pointing to your server. What this means is that anyName.myserver.com will resolve to the IP address of your server.
When changing from sub-sites to top-level sites, you must change the base domain.
It should be of the form .myserver.com. Sites will be created at siteName.myserver.com. Note the period in front of the name.
To switch from top-level sites back to sub-sites, it's important to switch the base domain back to a domain of the form www.myserver.com. (Use the actual domain name of your machine, of course.) Note that there is no period in front of the name.
Changing who can create sites
By default, anybody can create new Manila sites.
But you may prefer to limit this to the editors -- Managing and Contributing Editors -- of the site containing your Create a Manila Site page. Use the pop-up to change who can create new sites.
If you'd rather restrict who can create sites even more, you can make it so that new sites can only be created via the Control Panel. All you have to do is remove the Create a Manila Site macro from your hosting site. (Go there in your web browser, click Edit this Page, delete the macro.)
See Also
Moving the Create a Manila Site Form describes how to put the create-a-site form somewhere other than on the home page of your top-level site.
The guide to the Control Panel describes each of the pages and what settings you can change.
Control Panel Q & A answers additional questions about the Control Panel.
2. Web Server Q & A
Questions about running and administering Frontier's HTTP server are answered here.
How do I turn off the server? How do I turn on the server?
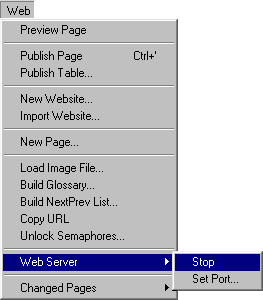
The Web menu has a Web Server sub-menu. The top item allows you to start and stop the server.
If it says Stop, then the server is running. If it says Start, the server is not running and can be started.
Do I have to start the server every time I launch Frontier?
Frontier remembers if the server was on last time.
If the server was on when you quit Frontier, it will automatically start when you launch Frontier.
If the server was off when you quit, it will be off when you launch.
How do I change the timeout? How do I change the number of connections?
Jump to user.inetd.config.http.
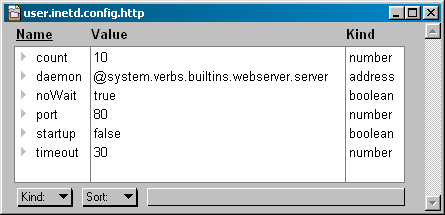
Count is the number of simultaneous connections Frontier will handle. Timeout is the number of seconds before the server will stop waiting for a request from a browser that's connecting to it.
If you change the number of connections, stop then re-start the server.
How do I turn on logging? How do I view the log?
You can turn on logging via the Control Panel. See the Settings->Logging page.
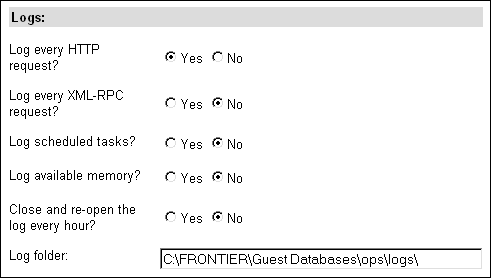
With logging turned on, you can see the most recent requests on the Readouts->HTTP page.
The log is stored in a guest database. There's a new one each day. Look, in the Window menu, for a database whose name is the current date, something like 2000-08-01.root. Look for a table named mainResponder inside that database.
You can log to a text file instead, or also, if you prefer. Text file logs are in Common Log format, which can be read by stats analysis programs such as Analog. See How to Log to a Text File.
I've seen on UserLand's site where you have lists of recently updated home pages and most read sites. Can I do the same thing on my server?
Yes. See this HowTo: Home Page Updates and Most-Read Sites.
How do I open my Control Panel?
See the Control Panel guide and the Control Panel Q & A.
How can I let people use Pike with the Manila sites on my server?
In the Control Panel, on the Settings->Manila page, click Yes to the question at the top: "Do you want the Manila RPC interface enabled?" Click the Submit button at the bottom of the page.
This allows Pike to communicate with Manila sites via XML-RPC.
I keep seeing the word "responders." What are responders?
A responder is a webserver component that knows how to handle a certain type of HTTP request. For instance, the RPC2 responder knows how to handle XML-RPC requests, and can respond with an XML-RPC response.
Most requests are for web pages; these requests usually come from a Web browser. mainResponder handles these requests.
Another responder, the SOAP responder, handles SOAP requests.
What's important to know is that you can enable and disable responders: which responders are active is in your control. Jump to user.webserver.responders. Wherever you see an item named "enabled," set it to true to enable the responder, false to disable it. See "How to Enable SOAP Responder" for an example of how to enable a responder.
The full version of 6.2 ships with just two responders enabled: default (mainResponder) and RPC2 (XML-RPC).
3. Control Panel
Overview
The Control Panel is a web browser interface for creating new Manila sites, configuring and maintaining Frontier, and finding out what's going on on your server.
Like Manila and the browser-based installation process, the Control Panel makes Frontier easier to use and administer.
How to open the Control Panel
The top three commands in the Server menu allow you to set your password, open it in your browser, and turn it on and off.
if you're upgrading Frontier, and you've never opened your Control Panel before, first set your password by choosing Set Admin Password... in the Server menu.
Then make sure the Control Panel is enabled. If the third item in the Server menu reads Disable Control Panel, then it's enabled.
To open the Control Panel in your browser, choose Open Control Panel. When your browser prompts you for username and password, type your email address (the address that's at user.prefs.mailAddress) and the password you've chosen.
You can access your Control Panel from anywhere by going to http://[ip-address-or-domain-name]/controlPanel/
(Note: more about security appears at the end of this page.)
Home
Here's what the home page of the Control Panel looks like:
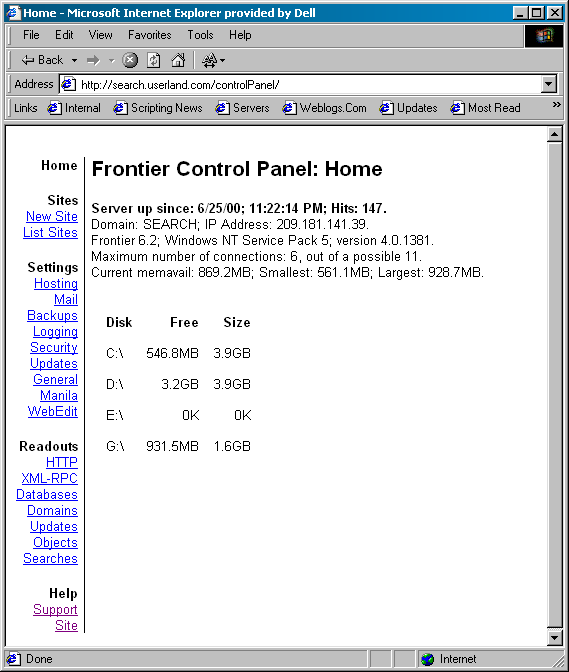
This is a status page -- it tells you how long your server's been up, how many hits it's served, how much memory is available, how much disk space you have left.
If there are any impending problems -- like running out of disk space -- you'll notice it here on the home page.
New Site
How do you make a new Manila site? Click the New Site link. On that page you're prompted for:
- Site name -- the name of the site to create. The input box appears inside a URL, so you know exactly where the site will be created.
- Name -- the name of the Managing Editor of the new Manila site. The Managing Editor is the "owner" of the site. It may or may not be you.
- Email -- the email address of the Managing Editor is also the username when the Managing Editor logs in to his or her site.
- Password -- this is the password the Managing Editor will use to login.
- Theme -- this is the name of the Theme to apply when creating the site.
When you click the Submit button, a new Manila site is created, and the home page is displayed in your browser.
List Sites
How do you find about the sites on your server? Click the List Sites link.
On this page is a list of sites. The site name is a link to the home page for that site. The name of each Managing Editor is a link to his or her profile page. The Modified date is the last time a new story, discussion group message, or picture was created on that site.
Settings
You can configure the most important server preferences through the various links in the Settings category.
Hosting
You can specify who can create sites, where sites are created, and whether or not sites are sub-sites or top-level sites. See Hosting Preferences for more about these settings.
Note: this panel was added in Frontier 6.2, June 2000.
Mail
The mail address is the default mail address for this server. It's usually your email address. Name and Organization are similarly your name and your organization. The mail host is the SMTP host, the domain name or IP address of the server Frontier should use when it sends email.
Backups
There are two main types of backups: you can choose whether or not to back up your Guest Databases and where to back it up.
You can also choose to archive discussion group messages to disk in XML format.
Logging
You can choose which logs Frontier should maintain, including HTTP, XML-RPC, scheduler, and more.
You can also choose to accumulate statistics for each domain you host and for each discussion group.
Security
You can set the global values for allowing directory listings and allowings script listings and allowing scripts to run. These settings can be over-ridden at the site level.
You can also choose to block all access except for specific IP addresses for both HTTP and XML-RPC requests.
Updates
Frontier can get updates for Frontier.root, mainResponder.root, manila.root, and prefs.root every night.
This process is safe for servers: no dialog boxes will appear, even if there's an error of some kind.
General
Miscellaneous and advanced features appear on this page. You can specify that your server is also a search engine server, you can turn on webserver profiling, and more.
Manila
You can turn on and off the Manila XML-RPC interface. This interface allows other applications to script Manila sites via XML-RPC.
You can set folders and URLs for pictures, static rendering, and gems. You can allow people to subscribe to discussion group messages via email.
Note: this panel was added January 20, 1999.
WebEdit
You can turn WebEdit access on or off. You can also add users, change information about current users, and grant and deny WebEdit access to users you've created through this form.
(Note: if you're not new to Frontier, you may have configured some of this via the People Suite web browser admin in the past. While that application still exists, it's main use was for managing WebEdit users, which you can do in the Control Panel instead.)
Add-ins
The Control Panel has an open architecture: you and other Frontier users can develop applications that can be configured through the Control Panel.
There are no Add-ins in the virgin installation, and so the Add-ins section doesn't appear in the Control Panel navigation. But once you add an Add-in, it will appear in the Control Panel.
Readouts
Here you can find out more about what's going on on your server. You can see the recent HTTP and XML-RPC requests, see what databases are open, find out what objects are checked out via WebEdit, and more.
HTTP
This readout displays the most recent HTTP requests, including time status code, number of bytes, and path. Below is a description of what each of the columns mean.
XML-RPC
The XML-RPC readout is like the HTTP readout -- you see the most recent XML-RPC requests, with information about each one, including the XML-RPC procedure name.
Databases
This readout lists the currently open databases, their size, the last time they were modified, and the folder they're in.
Domains
This readout lists the domains you host, their names and folder or address.
If you have turned on domain statistics in the Logging settings page, you'll also see the total number of hits and total number of bytes served from that domain.
Objects
This readout list the objects that are currently checked out via WebEdit.
Searches
If you're running a search engine server, here you'll see the most recent searches run and the most recent pages indexed.
Help
The last link in the Control Panel navigation is to the Support site, where you'll find pointers to more resources and help for Frontier users.
A note about security
You can turn off the Control Panel in the Server menu. If it's turned off, no one, not even you, can access it.
If you leave it turned on, it uses basic username and password authentication. You can use stronger security -- various levels of digest authentication -- if your browser supports it.
To set the security level, set config.mainResponder.controlPanel.securityLevel to a number 0 through 3, 0 being default basic security. Try setting 3. If your browser supports it, then leave it at 3. If not, try setting 2. Repeat until you have the maximum level that your browser supports.
A technote explains more about the various levels of security.
WebEdit and security
Anybody who can access your site via WebEdit can do anything you can do. It's important to give WebEdit access to only highly trusted people.
If you don't want anyone, not even you, to have WebEdit access, then use the WebEdit settings page to disable WebEdit Server entirely.
See Also
Control Panel Q & A
4. Control Panel Q & A
Questions and answers about the Frontier Control Panel.
Is there a guide to the Control Panel?
Yes.
How do I change my password?
The top item in the Server menu in Frontier, Set Admin Password..., allows you to change the password for the Control Panel.
Can I make the Control Panel more secure?
Yes, in fact it's recommended.
The Control Panel uses HTTP Basic authorization. You can instead use varying levels of digest authentication, which is stronger. (For technical details, see HTTP Authentication Schemes.)
Not all browsers support digest authentication, so it's not enabled by default.
There are four security levels, 0 through 3. 0 is weakest, 3 is strongest.
In Frontier, jump to config.mainResponder.prefs. Set securityLevel to 3. Try accessing the Control Panel in your browser. If it doesn't work, set securityLevel to 2, and so on, until you've found the strongest security level that your browser supports.
Can I create other users for the Control Panel without giving them my username and password?
Yes. From the Window menu, choose members.root. Expand the table named Admin -- this is the membership group for the Control Panel. Expand the table named users.
Select your user table -- single-click on the wedge to the left. Then, from the Table menu, choose New Sub-Table. In the dialog box that appears, type the email address of the new user. Click OK.
A new sub-table is created in the users table. Expand that sub-table. Edit the name of "item #1" to read "password." In the Value column, type the password for this user.
Can I disable the Control Panel?
Yes. The third item in the Server menu in Frontier allows you to disable and enable the Control Panel.
Is the Control Panel extendable -- can I add preferences for an application I wrote in Frontier?
Yes. The Control Panel has an open architecture.
Why doesn't the Open Control Panel command in the Server menu work?
When this happens, it's generally one of three reasons.
1. You haven't set your Admin password. Choose Set Admin Password..., the top item in the Server menu.
2. The Open Control Panel command uses http://127.0.0.1/controlPanel/ as the URL. The IP address 127.0.0.1 is supposed to always refer to the same machine. However, it doesn't always work on all machines, depending on configuration. Instead, type the URL manually into your browser -- http://[domain]/controlPanel/ -- where [domain] is the IP address or domain name of your machine.
3. The webserver isn't running. Turn it on via the Web->Web Server menu.
Can I customize the look of the Control Panel?
Yes, through Cascading Style Sheets. In Frontier, find your member record for the Control Panel. (In members.root, expand the Admin sub-table, expand the users sub-table.)
Look for a table named controlPanel in your member record. If it doesn't exist, create it.
Create a new wp-text object or outline named styleSheet that contains the CSS you want to use. It will automatically be used when you access the Control Panel.
This way you can change the font, background color, text size, anything that CSS will allow you to do.
5. How to Get Updates
Overview
In between releases of Frontier, we release bug fixes and new features via the root updates process. There are lots of smaller updates between actual releases of Frontier.
How to Update
To update a database, choose it from the Window menu so that it comes to the front. Usually you will update one or more of Frontier.root, manila.root, mainResponder.root, and prefs.root.
Make sure you're connected to the Internet. The updates come from updates.userland.com.
The top item in the Main menu should say Update manila.root..., if manila.root is in front. If you chose mainResponder.root, the menu item will say Update mainResponder.root... And so on.
Choose that menu item.
A dialog box will ask: "Connect with updates.userland.com to get latest update?" Click OK.
Depending on how many updates there are, it will take more or less time to get the updates. They will be installed in all the right places automatically.
How to Update Automatically
Frontier will get updates for you every night, automatically, if you wish. In fact, there's a good chance this is already turned on, as it's on by default in recent versions of Frontier.
Open your Control Panel, and click Updates, which is in the Settings section.
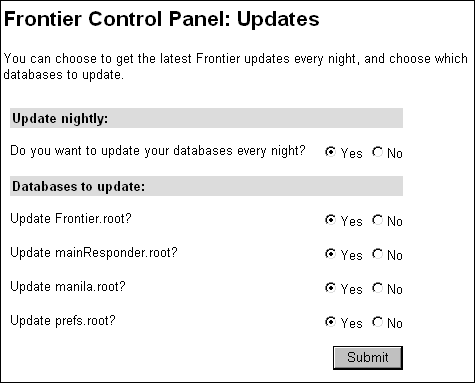
Here you can turn on and off nightly updates, and specify which databases to update.
Logging
You can keep a log of updates that come into your system.
To turn on root updates logging, go to the Logging page in the Control Panel.
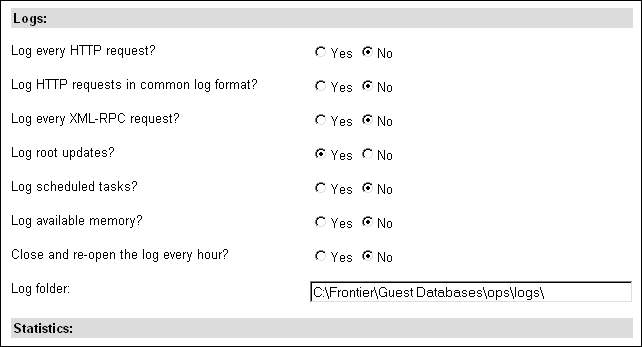
Click Yes for root updates logging, as shown above. Then click the Submit button at the bottom of the page.
Viewing the log
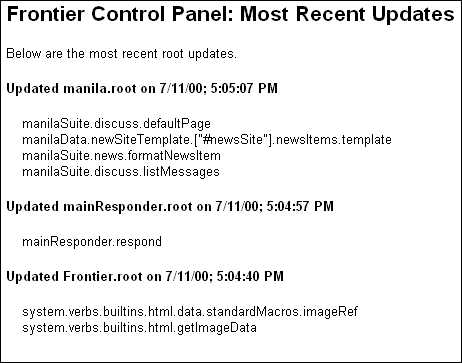
Visit the Updates page in the Readouts section. This will list the most recent updates since logging was turned on. (If you've just turned on logging, there won't be any updates yet.)
6. How to Create a Site List Page
Overview
Perhaps you're hosting a bunch of sites for a school. Each teacher has a site.
Then a student comes to your server, but can't remember the URL of his or her teacher's site. What does the student do?
Maybe send email to the webmaster. Maybe phone a friend. Maybe give up. (It's a modern-era excuse for not doing homework -- sorry teacher, I forgot your URL.)
But if you had a page listing all the sites on your server, that student could find the teacher's site.
Here's how you can create that page.
It's a macro
On your hosting site -- on the site with the Create-a-Manila-Site form, usually your top-level site -- create a page with a title like "Site List." Give it a relative path like /siteList.
In the text of the page, add this macro: {hostingSuite.listSites (false)}
Now look at your page -- it contains a list of the sites on your server. The list is very much like the site list that appears in the Control Panel. It lists the site names, and the names are links to the site. It also lists the names of the Managing Editors. The last mod date is the date the last time a message (or story, picture, News Item, or home page) was added to the site.
If you have more than 25 sites on your server, the list is broken up into multiple screens, just like a search engine.
Now the example student can find the example teacher just by looking at the names of sites and the names of the Managing Editors.
Add this page to the navigation of your hosting site if you want people to be able to find, or point to it from the home page.
Making the site list searchable
You might have lots of sites on your server. If so, you might want to consider making the list of sites searchable.
Use the macro like this: {hostingSuite.listSites (true)}
True means: yes, I want this to be a searchable list.
Now what you get is a search form. You can search for the site you're thinking of.
For example, a student might type the name of the teacher. Then what will appear is a list of all the sites for which that teacher is a Managing Editor.
Or the student might be searching for the site for Spanish 101 -- if the student types "Spanish" into the search form, then all the sites with the name "Spanish" in them will appear. So the list would contain the sites for Spanish 101, Spanish 102, and so on.
What gets searched: site names, site URLs, Managing Editor names, and Managing Editor email addresses.
Again, as with the regular list of sites, if there are more than 25 sites found there are multiple screens, just like with other search engines.
Tip
You might want to give people a choice: they could either view the entire list or go to the search page. In that case, create two pages. One page has the macro as {hostingSuite.listSites (false)} and the other has the macro as {hostingSuite.listSites (true)}.
See Also
See hostingSuite.listSites on Macros.UserLand.Com.
7. Moving the Create a Manila Site Form
Overview
When you install Frontier 6.2, the Create a Manila Site form is on the home page of your top-level site. You might want to move it somewhere else.
For instance, you might want that home page to be the home page of your business or workgroup or school.
You can move the form to another page on the same site or create another site entirely.
Or you can delete the form entirely from your public sites -- you can still create sites via the Control Panel.
Moving to another page
There are two things to know:
1. Your top-level site is a Manila site. Which means that you can customize it however you want, you can edit the home page, change the template, and so on.
2. The form is generated by a macro.
You can create a new story on site (your top-level site), give it a path like /create if you want, and put the macro on that page.
Just type {hostingSuite.createSiteForm ()}. (See the Macros website for more about this macro.)
Then, go back to the home page, click Edit this Page, and delete the macro.
Now your create-a-site page is at a URL like http://myserver.com/create.
Moving to another site
Perhaps you want the form to be on another site entirely.
First, create a new site. Remember the name you gave it.
Then find the table containing the site in Frontier. It's probably in manilaWebsites.root. Open it via Frontier's Window menu.
Now look at the names of the top-level tables in manilaWebsites.root. One of the tables with have a name like the name of the site you just created. If you created a site named createSite, you'd see something like createSiteManilaWebsite in home.root. (The name be longer, but it will start with createSite -- or whatever name you chose -- and end with ManilaWebsite.)
Double-click on the name (not the wedge) to select it. Copy the text of the name.
Now ctrl-J (cmd-J on Macintosh) to open the Jump dialog box. Type config.manila.hosting to go to your hosting preferences table.
Expand the sites table, then expand the default table.
In the Value column for the canonicalSiteName, paste the name of the website you created.
What you've just done is tell Frontier that your hosting site is now the site you just created, it's not the site Frontier created when you installed 6.2.
Now switch back to your web browser. In your newly-created site, edit a page (or create a new page) and include the {hostingSuite.createSiteForm ()} macro.
Then go back to your original hosting site and remove the createSiteForm macro from that site.
Deleting the form
Of course, you may not wish to have a Create a Manila Site form at all. You can still create sites via the Control Panel.
To remove the form, just click Edit this Page on your hosting page and remove the macro from the page.
See Also
Hosting Preferences describes how to set the preferences that specify where new sites are created and who can create them.
8. Home Page Updates and Most-Read Sites
Overview
You might want to add pages that display the most read sites on your server and the most recent home page updates.
We've found that these are popular pages on UserLand servers: Updates lists the most recently updated home pages; Most Read Sites lists the sites with the most page reads; Most Read Sites Yesterday lists the sites with most page reads the day before.
Updates
To create a page listing the most recently updated home pages on your server, create a new story, create a path for it like /updates (or whatever you want), and add this macro to the page: {hostingSuite.viewUpdates (20)}.
The number 20 is just an example -- this number specifies how many updates to show in the list.
Other ideas: you could include this macro on the same page with your Create a Manila Site form. Or you could put it in the template of that site.
See hostingSuite.viewUpdates at Macros.UserLand.Com for more about this macro.
Most Read Sites
Like the recent updates report, this report is generated by a macro.
There are two macros: one displays most read sites all-time, the other displays most read sites for the day before.
Create two new stories. In one, include the most read sites macro by typing {hostingSuite.viewMostReadSites ()}.
In the other, include the most read sites for the day before by typing {hostingSuite.viewMostReadSItesYesterday ()}.
For more about these macros, see Macros.UserLand.Com on hostingSuite.viewMostReadSites and hostingSuite.viewMostReadSitesYesterday.
See Also
Moving the Create a Manila Site Form describes another hostingSuite macro, the macro that generates the form that allows people to create new sites.
9. How to Change the URL of a Site
Overview
Sometimes you might make a change on a server that requires changing the URL of an existing Manila site.
The Server menu contains a Change Site URL... command that makes this easy.
Example
Say, for instance, there was a DNS change. Your server is no longer abc.myserver.com, it's now xyz.myserver.com. But the Manila site you're running still thinks it's on abc.myserver.com.
In other words, the site was at http://abc.myserver.com/MyFirstSite/, but now it's at http://xyz.myserver.com/MyFirstSite/.
You want your Manila site to know that its base URL has changed. You want all the links fixed.
How to change the URL
In Frontier, bring the guest database containing the site to the frontier. If your site is called MyFirstSite, for example, the guest database is probably called MyFirstSite.root.
From the Server menu, choose Change Site URL...
In the dialog box, type the new URL for the site.
For example, if your site is now at http://xyz.myserver.com/MyFirstSite/, type that in, then click OK.
What happens
Frontier then goes through the Manila site, replacing instances of the old URL with the new URL. Changes are made in the ftpSite, glossary, and urls tables. The template and discussion group text are updated.
The only part that may need to be updated by hand is the navigation links. These can be edited in the web browser, using Manila's standard interface.
Warning
It's best not to attempt to change the URL of a site by hand. The Change Site URL... menu item does this job for you. However, it can fail if you've started to change the URL of your site by hand. In other words, it's always best to use the menu item.
10. How to Move a Manila Website
Overview
Frontier stores some information about every Manila website you create. If you want to move a Manila website table from one location to another, you need to make sure that Frontier has up-to-date information about the site, or else the site won't work properly.
This HowTo explains the steps required for moving a website table from one location to another.
Find your website's table
The first thing you need to do is find the table which contains your website.
Use Control-J (Command-J on Macintosh) to open the jump dialog. Type config.manila.sites into the dialog, and click OK. This opens the table which keeps track of all of the Manila sites on your server.
Find an entry with a name similar to the name of your site. If your site is named mySite, you'd see something like mySiteManilaWebsite. (The name may be longer, but it will start with mySite -- or whatever site's name is -- and it will probably end with ManilaWebsite.)
Jump to the address this entry contains. You can use the Jump command to do this -- copy the address entry minus the leading @ character, and paste it into the jump dialog.
The table that opens is the table which contains your website.
Un-install the website
In the Server menu, select Uninstall Site. This command removes information Frontier may be storing about how to serve your site.
Copy the website to its new location
Open the parent table of your site -- on Windows, press the Backspace key, and on Macintosh, type Command-Shift-Enter. (Enter is the Enter key on the numeric keypad.)
Copy your website's table by selecting Copy from the Edit menu.
Next, open the table where you want to install your website, and paste your website table into that table. You may rename your website table at this point, if you wish.
Don't forget to delete the website from its old location.
Re-install the website
Select Install Site in the Server menu.
You'll see a dialog asking you what URL your website should have.
If you want to change the site's URL, type the new URL into this dialog. If you want to leave the URL the same as it was before, just click OK.
Summary
When moving a site from one location in Frontier to another, always use the uninstall, move, and re-install procedure. This ensures that all the data which Frontier uses to serve your website remains intact.
It also ensures that links in your website will continue to work properly, even if you have changed the URL of the site itself.
11. How to Configure Manila Site Downloads
Overview
The Manila site download feature allows managing editors of Manila sites to download their site as a Frontier database.
This page explains how to configure the site download feature.
Control Panel
Open the Control Panel in your browser, and go to the Manila settings page.
There are four settings in the Site Downloads section. (Screenshot.)
Click Yes to the question: Do you want to allow Manila editors to download their sites?
Enter the path to the folder in which exported Manila sites will be stored into the field labeled Folder for exported site databases.
Example: C:\Frontier\Guest Databases\www\exportedSites\ (include the trailing backslash).
Macintosh example: Macintosh HD:Frontier:Guest Databases:www:exportedSites: (include the trailing colon).
If you're using a server on another machine to serve downloaded sites, enter a path to a folder on that other machine. (Make sure file-sharing is set up.) Be sure to create the folder you specified if it doesn't already exist.
Frontier also needs the base URL for the exported sites folder. The base URL tells Frontier how to generate links to the exported files.
The base URL should begin with http://, and end with a slash. Examples: http://files.mydomain.com/downloadedSites/, http://www.mydomain.com/files/downloadedSites/.
Enter the URL into the field labeled URL for site databases.
If the exported sites will be served by Frontier, click Yes to the question: Will Frontier be serving downloaded sites? If the exported sites will be served by a static server such as Apache, IIS or WebStar, click No.
Click the Submit button.
What is exported and when
When the managing editor of a Manila site goes to their download page, the site is exported to a database corresponding to the name of the site. The database is saved in the folder specified in the Control Panel.
Once the site export is completed, Frontier returns a page which contains a link to download the database.
Sites will be exported at most once in a 24 hour period, no matter how many times the download page is requested. This limits the load on the server.
For security and privacy reasons, the downloaded site will not contain user passwords or custom preferences. Otherwise, all the data in the Manila site is included.
See also:
How to Download Your Manila Site
12. How to Manage Themes
Overview
When you've found a Manila site with a theme you want to install on your server, first download the theme file, then put it in the /Guest Databases/ops/themes/ folder. If the folder doesn't exist, create it.
At the beginning of every minute, Frontier checks for new and updated themes in the themes folder and installs any that it finds.
That's it: that's all it takes to install a theme.
About theme files
Theme files are Frontier files, they're exported tables. You can open a theme in Frontier manually.
However, it's better to let the themes loader do the installing.
The themes loader first validates the table structure of the file to make sure it's a valid theme file.
Then it performs security checks. It makes sure there are no script objects in the theme file. It makes sure that all the macros called in the various templates are legal macros on your server. Any illegal macros are neutered.
config.manila.themes
Themes are stored in config.manila.themes. The name of the theme file matches the name of a table in config.manila.themes. (Minus the .fttb suffix.)
The name of a theme's table is usually similar to the name that's displayed in the themes site prefs page. However, it may not be the same. The theme's display name is stored at [theme].info.displayName.
You can edit your installed themes directly: config.manila.themes is your space.
Uninstalling a theme
You can make a theme non-public by going to its table in config.manila.themes and setting flPublic to false. Then the theme won't appear on the Themes switcher pages on Manila sites on your server.
You can disable a theme entirely by setting flEnabled to false.
You can delete a theme entirely by deleting its table from config.manila.themes. However: make sure you don't still have it as a file in the /Guest Databases/ops/themes/ folder -- because it will be re-imported at the top of the next minute.
The Default theme
A theme named Default is required. If you want only one theme enabled, make it the Default theme. As with other themes, you're free to edit it. If you want every site on your server to start with the same theme, this is how you do it.
manilaData.themes
This table contains UserLand-supplied themes. Themes in this table are automatically copied to config.manila.themes.
Don't make changes to manilaData.themes, make changes in config.manila.themes. If you want to disable a UserLand-supplied theme, set flEnable to false for that theme's table in config.manila.themes.
See Also
What Are Themes? introduces themes and explains how to use them from the Manila user's point of view.
How to Create a Theme explains how to create a theme and make it available for downloading.
13. How to Configure Gems
Overview
The Gems feature allows Manila website editors to upload files of any type -- movies, sound files, zip files, spreadsheets, etc. -- to their Manila websites.
This page explains how to configure Frontier to store and serve Gems.
Where Gems are Stored
Uploaded files are stored on disk. You specify the location of the files using the Control Panel.
Gems may be served by Frontier, or by another webserver running on another machine.
Three options
There are three most common configurations. Before getting started, decide which one applies to you.
1. Gems will be served by Frontier, from a sub-folder, such as www.mydomain.com/files/.
2. Gems will be served by Frontier, using a virtual domain such as gems.mydomain.com.
3. Gems will be served by another webserver running on another machine.
If you're using a server running on another machine, you'll need to make sure file-sharing is set up, so Frontier can read and write files to that other machine's hard drive.
Configuring Gems Storage
Open the Control Panel in your browser and go to the Manila settings page.
There are four settings in the Gems section. Here's a screenshot.
Click Yes to the question: Do you want to allow Manila editors to upload files of any type?
The default limit is 1.0MB of files per site. If you want to change the limit, enter it into the field labeled Folder size limit per site.
Next, enter the path to the folder in which Gems will be stored into the field labeled Folder for Gems.
Example: C:\Frontier\Guest Databases\www\files\ (include the trailing backslash).
Macintosh example: Macintosh HD:Frontier:Guest Databases:www:files: (include the trailing colon).
If you're using a server on another machine to serve Gems, enter a path to a folder on that other machine. (Make sure file-sharing is set up.)
In the Windows Explorer or Macintosh Finder, be sure to create the folder you specified if it doesn't already exist.
Frontier also needs the base URL for the gems folder. The base URL tells Frontier how to generate links to a Gem.
The base URL should begin with http://, and end with a slash. Examples: http://files.mydomain.com/, http://www.mydomain.com/files/.
Click the Submit button.
Frontier is now configured to store Gems uploaded to the server, and to render links to Gem files, but Frontier still needs to know how to serve the files when a user clicks a link to a Gem file.
Serving Gems from a sub-folder of your website.
This is choice #1 -- you're serving Gems from a sub-folder, such as http://www.mydomain.com/files/.
Here's how to configure your siteTree.
In Frontier, jump to config.mainResponder.domains.
There will be a sub-table whose name is either "default" or the same name as your server's domain name. Expand that table; expand the siteTree table; expand the directory table.
Open the outline object in the directory table. (Note: the object is named outline, but it may be a wp-text object on your machine.)
Add a line under the top-level site, something like:
<site name="files" folderPath="C:\Frontier\Guest Databases\www\files\"/>
Here's a screenshot.
This line tells Frontier that, when a URL begins with http://www.mydomain.com/files/, Frontier will look in C:\Frontier\Guest Databases\www\files\.
It's important to note that we used "files" instead of "gems" because using "gems" for the name would render the Gems feature unusable. This is because the URL for the Gems list page in the top-level Manila site is http://www.mydomain.com/gems/. When picking a name for your Gems folder, use a name that is not the path to any pages in your Manila site.
Serving Gems using a virtual domain
This is choice #2 -- serving Gems from Frontier using a virtual domain.
Jump to config.mainResponder.domains.
Create a new filespec (Table menu->New Special->File Spec), and give it the name of the virtual domain you want to serve gems from. Examples might be gems.mydomain.com or files.mydomain.com.
Set the value of the filespec to the path to the Gems folder on your server's hard disk. This should be identical to the path you entered in the Control Panel in the previous section. Remember to include the trailing slash.
For example, if your Gems folder is C:\Frontier\Guest Databases\www\gems\, make gems.mydomain.com's value C:\Frontier\Guest Databases\www\gems\.
Here's a screenshot.
Serving gems using a server other than Frontier
This is choice #3 -- serving Gems from a server other than Frontier.
In this case, Gems are still uploaded via Manila, via Frontier -- but another server such as Apache, WebSTAR, or IIS serves the files. One reason to do this is that Frontier is optimized for serving data from the object database, rather than from disk, while many other servers are optimized for serving files from disk.
You will need to set up file-sharing: the hard drive of the external server should be mounted on the machine running Frontier. This is necessary because Frontier needs to be able to save incoming files to that server's hard drive.
For example, if you want to use IIS on a second machine, mount the IIS server's www folder as disk E:, and tell Frontier to save files to E:\gems\ instead of to the local disk.
In this case, you don't need to set up anything in config.mainResponder.domains -- but you do need to configure your external server. Consult the documentation for that server.
See also
Gems for Manila
Control Panel
Manila and Static Pictures
How to Set Up Static Rendering for Manila Sites
XML siteTree Feature
14. How to Make a Create a Manila Site Form
Overview
Once you have upgraded to Frontier 6.2, you can allow any user to create a website on your server.
The full version of 6.2 creates a site for you that has a Create a Manila Site form on the home page. If you're upgrading, you can add this form to an existing site, or create a new site that includes this form.
Adapting a site to provide hosting
Any Manila site can be a hosting site.
To make a manila site a hosting site, first jump to config.manila.sites.
Find the site that you want to turn into a hosting site.
Double-click on the name (not the wedge) to select it. Copy the text of the name.
Now ctrl-J (cmd-J on Macintosh) to open the Jump dialog box. Type config.manila.hosting to go to your hosting preferences table.
Expand the sites table, then expand the default table.
In the Value column for the canonicalSiteName, paste the name you'd copied from the config.manila.sites table.
What you've just done is tell Frontier that your hosting site is now the site you chose in the config.manila.hosting table.
Now switch back to your web browser. In your site, edit a page (or create a new page) and include the {hostingSuite.createSiteForm ()} macro.
This macro generates the form used to create a new site on your server.
See Also
Hosting Preferences describes how to change your preferences -- who can create sites and where sites get created -- via the Hosting page in the Control Panel.
Changing the Text for New Sites describes how to alter the default text for new sites.
hostingSuite macros for a list of hosting-related macros you can use.
15. How to Set Up Additional Hosting Sites
Overview
A new feature of Frontier 6.2 is site hosting. With Frontier 6.2, you can allow anyone to easily create new Manila websites.
A new macro, hostingSuite.createSiteForm allows you to include a create-a-site form. By default, this form is on the home page of the top-level site created when you install a clean copy of Frontier 6.2.
This HowTo explains how to create additional hosting sites.
Hosting site preferences
Manila stores hosting site preferences in a table at config.manila.hosting. For each hosting site on your server, there will be a subtable in config.manila.hosting, which specifies the hosting preferences for that site.
A site's hosting preferences table contains four items:
baseDomain -- The base domain to use when creating sites using this hosting site.
canonicalSiteName -- The canonical name of this Manila hosting site.
flEditorsOnlyCreate -- A flag specifying whether only editors can create sites, true means only editors can create sites, and false means anyone can create a site.
flSubSites -- A flag specifying whether to create sub sites whose URLs take the form http://myserver.com/mySite/ or top-level sites, whose URLs take the form http://mysite.myserver.com/. True means create sub-sites, and false means create top-level sites.
Create a new website
First, we need to create a new website, which we'll make into a hosting site in the next section. If you already have a site that you want to turn into a hosting site, skip to the next section.
Go to the Control Panel for your server. You can either open the Control Panel using your browser by going to http://myserver.com/controlPanel, or by selecting Control Panel from the Server menu in Frontier.
Click the New Site link on the left side of the page.
Fill in the form and click the Submit button.
In a few seconds you should see your new site.
Configure hosting preferences
First you need to find the name of the site you just created (or the site you want to make into a hosting site). In Frontier, jump to config.manila.sites.
You should see an entry in that table with a name similar to the name of your site. It will be longer than the name you used to create the site, and it should end with ManilaWebsite.
Double-click the name of that entry in the table (not the value). This is the canonical name of your website. Select Copy from the Edit menu.
Jump to config.manila.hosting, and create a new table. Give the table the name of your site. The table can actually have any name, but it's easiest to find later if it has the same name as your website.
Inside this table, create the four entries described above:
First create a string named canonicalSiteName, and paste your site's canonical name into the value field for the string.
Create a boolean named flSubSites, and give it a value of true if you want your new hosting site to create sub-sites, or false if you want it to create top-level sites.
Then create a string named baseDomain, which should be a string containing the base domain that your new hosting site will use for creating sites. Normally, this is the same base domain as your default hosting site. If your value for flSubSites is false, then this string should start with a dot like this: .myserver.com
Last, create a boolean named flEditorsOnlyCreateSites. Set it to false if you want anyone to be able to create sites, or true if you only want editors of your new hosting site to be able to create sites.
Add the Create a Site form to your site
In your web browser, open your site, and login as the managing editor, if you aren't already.
Click the Edit this Page button on the homepage.
Replace the text of the homepage with this macro:
{hostingSuite.createSiteForm ()}
This places the create-a-site form in the homepage.
Click the Post Changes button.
You should now see a create-a-site form on the homepage of your site.
Notes
You don't have to put the create-a-site form on the homepage. It can be on a story page, or even in a discussion group message.
If you want to create a hosting site in a domain other than the one in which your default hosting site resides, you'll need to create a siteTree structure for that domain in your config.mainResponder.domains table.
You can read about the siteTree structure on the XML siteTree Feature page on the Frontier website.
Sub-sites may only be created at the top-level of a given domain. You can't use the create-a-site form to create sites with URLs like http://myserver.com/users/newSite/
16. How to Enable the Manila SOAP Interface
Overview
Manila's SOAP interface, like its XML-RPC interface, allows external applications to automate Manila websites, to get and set messages, add to the home page, upload templates, and more.
The interfaces for SOAP and XML-RPC are the same, the difference is the protocol used. The Manila RPC spec describes both interfaces.
How to turn on the interface
Make sure Frontier.root, mainResponder.root, and manila.root are up to date as of 11/19/00. See How to Get Updates if you're unsure about the updates process.
Then open the Control Panel in your browser and go to the Manila settings page.
To the question -- Do you want the Manila SOAP interface enabled? -- click Yes. Click the Submit button at the bottom of the page.
Now the SOAP interface is enabled; you're finished.
Technical details
When you enable the SOAP interface, the SOAP responder is automatically enabled.
The address of the Manila handler scripts is placed at user.soap.rpcHandlers.manila.
If you disable the Manila SOAP interface later, the address of the Manila handlers is removed from the user.soap.rpcHandlers table. However, the SOAP responder is left enabled, since you may have other applications which require the SOAP responder to be enabled.
In Manila, just one set of scripts handles both SOAP and XML-RPC messages. These scripts are stored at manilaSuite.rpcHandlers. The handlers don't know and don't need to know which protocol is used. This allows us to maintain just two interfaces with just one set of scripts. (Scripters note: you can do the same with any handlers that you write.)
See Also
Manila RPC Spec
SOAP for Frontier
Control Panel
17. How to Enable SOAP Server
Overview
Frontier 6.2 ships with support for SOAP, a new XML-based remote procedure protocol.
SOAP is like XML-RPC. One computer sends a message to another -- do this, or get me this data -- and the other machine replies. The two computers might be in the same room, or as far apart as Chicago and Australia. SOAP travels over the Web. The two computers might both be running Frontier, or they might not be, as SOAP works with other languages too.
Turning on the SOAP server
If you want your machine to be a SOAP server -- in other words, if you want it to be able to respond to SOAP requests from other computers -- then you need to enable the SOAP responder.
First, some background. A responder is a webserver component that knows how to handle certain types of requests. mainResponder serves web pages and Manila sites. The RPC2 responder handles XML-RPC requests. The SOAP responder handles SOAP requests.
Jump to user.webserver.responders. Expand the table named SOAP. (Double-click on the wedge to the left.)
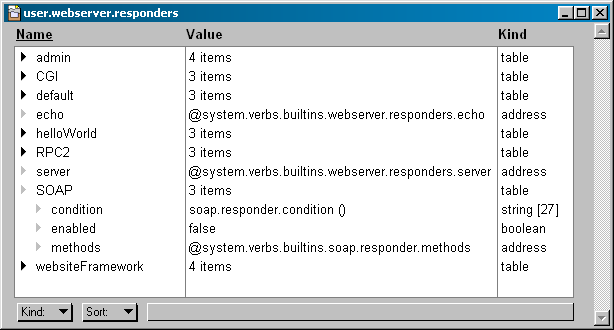
In the SOAP table, the enabled item is false. Change that to true. Now your copy of Frontier is a SOAP server, as long as the webserver is on. That's it.
More info
SOAP for Frontier describes how to write scripts that call your SOAP server. If you've done any XML-RPC scripting, you'll find this very familiar. (Note: that page was written just before 6.2 shipped. You can ignore the part about downloading and installing SOAP, since you already have it.)
Also see Soap.Weblogs.Com where you can read SOAP news and developments.
18. Changing the Text for New Sites
Overview
When a new site is created, the title of the home page is It Worked! and the text introduces the editor to Manila.
However, you may want to change this for your service.
config.manila.themes
In Frontier, type ctrl-J (cmd-J on Macintosh), type config.manila.themes, click OK. Expand the Default table, then expand the Pages table.
Inside the Home table are two items, text and title, that specify the text and title of the home page for new sites created on your server.
You can edit the title directly -- by default it says It Worked!, but you can make it say whatever you want.
To edit the text for new home pages, double-click the wedge next to the text item. A wp-text window will open containing the default text. Edit it however you like.
About page
You may have noticed a similar table for the About page -- yes, you can edit the text and title of the About page also, the same way you did for the home page.
Export the theme
When you're finished, it's a good idea to export the Default Theme to your themes folder.
Single-click the wedge to the left of the Default table. This selects the table. Choose Export from the Main menu (or type ctrl-3 or cmd-3). If you're on a Mac, accept the defaults that appear in the first dialog box and click OK.
Then, in the Save dialog box, navigate to the Guest Databases/ops/themes/ folder. Important: edit the file name so that it is Default.fttb.
19. Changing the Text for New Sites
Overview
When a new site is created, the title of the home page is It Worked! and the text introduces the editor to Manila.
However, you may want to change this for your service.
config.manila.themes
In Frontier, type ctrl-J (cmd-J on Macintosh), type config.manila.themes, click OK. Expand the Default table, then expand the Pages table.
Inside the Home table are two items, text and title, that specify the text and title of the home page for new sites created on your server.
You can edit the title directly -- by default it says It Worked!, but you can make it say whatever you want.
To edit the text for new home pages, double-click the wedge next to the text item. A wp-text window will open containing the default text. Edit it however you like.
About page
You may have noticed a similar table for the About page -- yes, you can edit the text and title of the About page also, the same way you did for the home page.
Export the theme
When you're finished, it's a good idea to export the Default Theme to your themes folder.
Single-click the wedge to the left of the Default table. This selects the table. Choose Export from the Main menu (or type ctrl-3 or cmd-3). If you're on a Mac, accept the defaults that appear in the first dialog box and click OK.
Then, in the Save dialog box, navigate to the Guest Databases/ops/themes/ folder. Important: edit the file name so that it is Default.fttb.
20. How to Flip the Manila Sites Database
Overview
When a new Manila website is created, it's stored in a database containing other Manila sites. By default, this database is manilaWebsites.root.
As manilaWebsites.root grows, it's a good idea to "flip" -- to start using another database for new Manila sites.
One of the reasons do this is that there's a 2GB limit on the size of databases. You should flip well before you reach that limit, so your sites have room to grow.
Here's how.
Create a new database
Create a new guest database via the File menu. Give it a name like manilaWebsites2.root.
With the new database in front, choose Add to user.databases... from the Server menu. This will ensure that the database is opened automatically when Frontier starts up.
Edit your Manila prefs
Jump to config.manila.prefs.
Set the hostingGdbName to the name of your new database. It's a string; its value should now be manilaWebsites2.root (or whatever you named your new database).
Test
In the Control Panel, go to the New Site page. Create a new test site.
Then, back in Frontier, look at your new database. Does it contain a new table, with a name that contains the name of the site you just created? It should.
If there were an errors in testing, go back and make sure you typed the name correctly in your Manila prefs. Make sure the name matches the name of the database.
21. How to Log to a Text File
Overview
Frontier logs HTTP requests to the daily log guest database. But if you want to generate a log in a format log analysis software can read, you might want to consider logging to a text file.
About the Common Log format
There's a brief description on the W3C's site. The main benefit of this format is that, since so many webservers use it, there are many stats analysis applications that can read it. Hence the name "common" -- it's a common feature.
Turning on logging
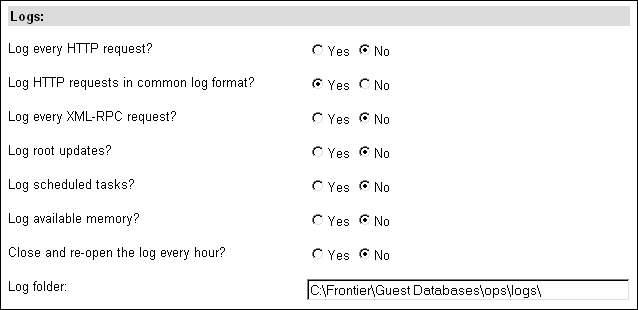
Go to the Logging page in the Control Panel, and click Yes, as shown below, then click the Submit button at the bottom of the page.
Where to find the logs
Your log folder is also set on the Logging page. Usually it will be in Guest Databases/ops/logs/, though you may have changed that.
If you've turned on Common Log logging, then you'll have a new folder inside your log folder. The new folder is called "Common Log."
These are text files, you can open them with NotePad or BBEdit or any other text editor.
There's a new file generated each day. Files have names like 2000-07-11.txt. In other words, the file name format is yyyy-mm-dd.txt.
Analog
Though Analog is far from the only stats analysis program, it's very popular -- and free. There's even a mailing list for Analog users.
Versions of Analog run on Macintosh, Windows, and UNIX. Source code is available.
Customization
The Common Log format could also be called a lowest-common-denominator format. There are things it doesn't log. For instance, the requested host isn't logged. If you're doing virtual domains, this means you can't tell a request for abc.com/ from a request for xyz.com/.
You can generate logs in a custom format, any format you wish, even formats you invent, if you're willing to do some scripting. The user.webserver.postFilters table contains scripts that get called for every request. They run after the request has been handled, so you know everything about the request.
You'll note that, if you have Common Log logging on, there's a script there called commonLog, that calls webserver.postFilters.commonLog.
If you want to do custom logging, start by copying webserver.postFilters.commonLog to your workspace table. Edit it to output the log format you prefer. (You may also want to change the name of the folder it writes to.)
Then delete user.webserver.postFilters.commonLog. Add a script in that table that calls your custom logging script.
22. Performance Tips
Overview
Here are a few tips for getting the most performance out of Frontier running as a server.
Bandwidth, machine speed
Naturally, the more bandwidth you have the better.
Similarly, faster machines will render pages more quickly.
Memory
If you're on a Macintosh, allot as much memory as you can to Frontier. The more memory you can give to Frontier, the more websites you can host.
On both Macintosh and Windows, the more physical RAM present in the machine the better. Running Frontier on a server with, for instance, only 32 MB of physical RAM doesn't leave you much left over after the system uses the RAM it needs.
Other applications
If you don't have to run other applications on the same machine, don't. No matter what OS you're using, your machine still has to split its attention between all the different apps that are running.
The ideal server is running just Frontier and whatever the system needs to function. Of course, depending on your circumstances you may need to run other applications -- and that's okay, but whenever possible it's a good to minimize the number of other applications running.
Turn off logging
Unless you actually use your logs, you can turn off HTTP and XML-RPC logging via the Control Panel.
Frontier 6.2 ships with logging off by default.
Disable un-needed responders
Frontier 6.2 ships with only two responders enabled -- mainResponder and XML-RPC. However, if you've upgraded to 6.2, you may have other responders enabled that you don't use. Turning those off will help performance.
See this Responders Performance Tip on the Frontier site.
Turn off closing and re-opening the log database
In 6.1, it was a good idea to turn on closing and re-opening the log database every hour.
In 6.2, this ships turned off, as it was no longer needed. If you're upgrading to 6.2, it's a good idea to turn this off.
Static pictures and gems
If you have a static server -- Apache, WebSTAR, IIS, etc. -- running on another machine, it's a good idea to use that server for pictures and gems that are uploaded to Manila sites rather than have Frontier serve those files. This way Frontier can concentrate on rendering pages.
There's a HowTo on static pictures and one on Gems.
23. How to Create and Run a Script
Overview
Sometimes you'll find instructions in a HowTo that tell you to create a script and run it -- so it's important to know how to do that, even if you don't plan on writing your own scripts.
This isn't an introduction to scripting, but a practical guide to running a script when a HowTo calls for it.
Quick Script Window
For one-line scripts, the Quick Script window is convenient.
To open it, type ctrl-; (cmd-; on Macintosh).
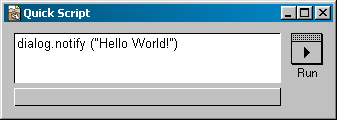
In the text area, type a script, then click the Run button. In the space below the text area appears the result.
Here's an example which counts the number of Manila sites installed on your server.
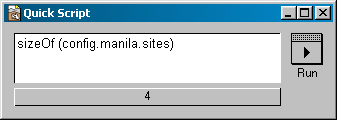
The result is 4 in the above example -- the number will most likely be different on your machine.
Longer scripts
If the script to run is more than one line, it's easier to create a new script window. Type ctrl-N (cmd-N on Macintosh) to open a new untitled script window.
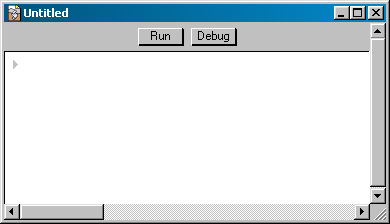
Tip: often you can copy and paste a script from your browser into the window.
Here's an example multi-line script:
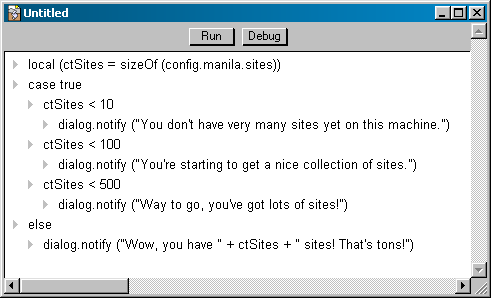
Note the indentation -- if you're copying a script from a HowTo, the indentation that appears in the Web page should be followed in the script. Usually, doing a copy-and-paste will do the right thing. You can indent and un-indent using Tab and shift-Tab. You can also use the mouse -- click on a wedge and drag it.
To run a script in a script window, click the Run button. If the script has anything to tell you, it will often present it in a dialog box. (As the above example does.)
Most of the time, any script that a HowTo tells you to run is something you need to do only once. So, once you've created it and run it, you can close the window without saving changes.
But you can of course save the script on disk. You might want to create a folder in your Frontier folder named My Scripts and save scripts there. Then, if you later want to open the script again in Frontier, you can use Frontier's Open command, or double-click on it in the Macintosh Finder or Windows Explorer.
See Also
If you're interested in writing Frontier scripts, see Writing Frontier Scripts in the Frontier Users Guide.
24. Serving Root Files Whole
Overview
Frontier 6 can serve binary files, binhexes and zip files, mpegs and jpegs and gifs. But there's one kind of binary file it has a lot of trouble with, Frontier object databases, ".root" files. Why? Because it normally does something very special with them, it dives into the file and starts serving out of the hierarchy that the root file contains.
But there are times when we want to serve a root file as a binary, for example, when we want to make it possible for people to download a whole root file. A simple convention makes this possible.
Put a # at the beginning of the file name
Let's say you have a root file, temp.root, that you want to serve whole. Here's how you do it.
Put a # at the beginning of the file's name, changing its name to #temp.root.
When you refer to it thru a URL, do not include the #.
As mainResponder.respond is serving, if it can't find the file you specified, it will check to see if there's a file with the same name with a # as the first character. If so, it will serve that file, as a binary. So this technique can be used to serve other files that Frontier may interpret in a special way, today or in the future.
25. user.webserver
Overview
The user.webserver table contains preferences, data, and code used when Frontier is running as a webserver or running behind another webserver.
It's set up by webserver.init, which is called every time Frontier is launched.
user.webserver.actions
This table contains action scripts, which are handlers Frontier uses when running behind Mac OS webservers such as WebSTAR, Quid Pro Quo, WebTen, and so on.
For an example use of action scripts, see http://www.scripting.com/frontier5/howtos/webstarWsfPages.html
user.webserver.callbacks
This table contains user callback scripts called from the CGI Framework. The CGI Framework pre-dates the webserver framework -- it's the framework that's used when .fcgi pages are requested.
user.webserver.cgis
This table contains CGI Framework CGI scripts -- requests that end with .fcgi are handled by scripts in this table.
user.webserver.postFilters
PostFilter scripts are called after a request has been handled by the webserver framework, but before it's been returned to the client. In this table you might implement logging, a console window, and so on.
For an example use, see http://www.scripting.com/frontier5/howtos/webserverConsole.html
user.webserver.preFilters
PreFilter scripts are called before a request is handled by the webserver framework. PreFilter scripts have the ability to change the request before Frontier processes it.
user.webserver.prefs
This is a table of various webserver preferences.
chunkSize is used by the CGI Framework: it's the size of in K of chunks of data to return to the external webserver.
defaultResponder is the name of the default responder.
errorPage is a template used by some responders to create an error page.
ext2MIME is a table of file suffixes matched with their MIME types.
fileNotFoundPage is a template used by some responders to create a file not found page.
fldebug, when true, means the webserver is in debug mode. When it's in debug mode, information about each request is stored in tables in system.temp.webserver. (This storage is handled by user.webserver.preFilters.debug and user.webserver.postFilters.debug.
flStats turns on stats maintenance. Stats are stored at user.webserver.stats. (More about this appears below.)
flUseDns, when true, means that Frontier will attempt a DNS reverse lookup on webserver clients.
flWaitDuringStartup, when true, means that Frontier's webserver will wait to handle any requests it receives while Frontier is starting up. It waits by looping until Frontier is no longer starting up. Important note for people running Frontier behind IIS -- set this preference to false, otherwise Frontier may hang during startup. Everybody else should set this to true.
hostName is used by the CGI Framework to report the name of the host in the returned HTTP headers.
MIME2icon is a table that matches MIME types to icons, which are stored in the icons table in resources.root.
MIME2name is a table that matches MIME types to short names.
mimeTypes matches Macintosh file type codes to MIME types.
serverAppID is used by the CGI Framework to store the application ID of the server Frontier is running behind.
type2MIME is a table that matches Macintosh file type codes and Frontier object types to MIME types.
websiteFolderPath is used by the CGI Framework: it's the path to the website folder.
user.webserver.responders
Responders handle incoming requests: each responder has a chance at handling each request.
For more information about responders, see http://www.scripting.com/frontier5/betty/developing/default.html
user.webserver.stats
This table contains webserver statistics: it's re-initialized each time Frontier starts up.
hits is the number of requests since Frontier last started.
maxConnections is the most simultaneous connections Frontier has handled.
maxMemAvail is the most amount of memory Frontier has had available.
minMemAvail is the least amount of memory Frontier has had available.
upSince tells when Frontier was last started up.
26. How to Set Up a Search Engine Server
Overview
The mainResponder search engine consists of two main parts. One part is the search engine client, the machine that contains your websites and discussion groups. The other part is the search engine server, the machine that contains the search engine index and the search page.
These two machines can be the same machine, or they can be separate machines.
What follows is how to set up the search engine server.
config.mainResponder.prefs
Set config.mainResponder.prefs.flSearchEngine to true -- this means that this machine is a search engine server.
Set flAllowPublicSearchSubmissions to false if this machine is the same machine as the one that contains your websites. Set it to true if client and server are separate machines, or if there are multiple clients.
Hourly task
Jump to user.scheduler.hourly. You should see a task named searchEngine with an address that points to mainResponder.search.server.indexStoredPages.
If you want your search engine to index pages more frequently, you can move this task into the user.scheduler.everyMinute table.
Search Engine Security
If you've set config.mainResponder.prefs.flAllowPublicSearchSubmissions to true, that means that anyone can add to your search engine. However, you might want to limit this.
You can add one or more scripts to the config.mainResponder.callbacks.searchEngineSecurity table. The easiest way to limit who can add to your search engine is by checking IP addresses, generating a scriptError when an XML-RPC message is received from a client that's not allowed to add to your search engine.
A simple example security callback script might look like this:
if client != "209.181.141.35" and client != "209.181.141.36"
  scriptError ("Can't index this page because it doesn't come from a trusted client.")
Search page
An example search page is provided for you, it's the default page in the search table in htmlInterfaces.root. It's expected that you will customize this website to look and work the way you want it to.
config.mainResponder.urls.searchHome
This should be set to the URL of your main search engine page.
Index.root
The search engine server stores its index in Index.root, which lives on disk in the ops folder. You don't need to create this index yourself, the search engine will do it for you.
However, you may wish to add a user.databases entry for Index.root. f should be the path to the index on disk, openOnStartup should be true, runStartupScript should be false, supportsSubscribe should be false, and supportsIndexing should be false.
Logging
The search engine server maintains two logs, both stored in your daily duest database log.
The Search Engine log stores information about what searches have been run, including the search string, the IP address of the browser that ran the search, and the number of matches for that search.
You can view this log in your browser through logBrowser.root, through a URL such as http://localhost/logBrowser/searchEngine
The Search Engine Indexer log stores information about the pages that have been indexed, including the client that sent the page to the server, the name and URL of the site, the title, and the URL of the page that's been indexed.
You can view this log also, through a URL such as http://localhost/logBrowser/indexer
(In the above URLs, substitute localhost with the IP address or domain name of your search engine server.)
27. How to Set Up a Search Engine for Manila Sites
Overview
Setting up searching for Manila sites is a two-step process: setting up your search prefs in your Manila sites, and setting up your search engine server.
Your Manila sites may or may not be on the same machine as the search engine. In fact, you can have Manila sites on many machines distributed around the world that are all searchable by your search engine.
Setting up your Manila site
In the site prefs section, click on Searching.
Click Yes that you want your site indexed by a search engine, and click Yes if you want all discussion group messages indexed.
Enter the name of your site as it should appear in a search engine results page. Make sure the URL of the home page of your site is correct.
Then enter the domain name or IP address of your search engine server. You may not have set up a search engine server yet, but you should already know what machine you plan to use.
Your search engine server will probably be listening on port 80, the default port, unless you're also running another webserver on that machine.
If it's a Frontier search engine server -- and for this HowTo, we'll assume it is -- then the last two items are already fine. The name of the procedure is mainResponder.search.index, and the XML-RPC path is /RPC2.
Setting up your search engine server
Go to the Control Panel on your search engine server. In Settings->General, click Yes that this machine is a search engine server.
Now go to the New Site form and create a new site -- this will be the site that contains your search page.
Go get the Search Page sample macro. It's a safe macro that implements a search page.
In Frontier, use the Make a macro legal sample to make the search page macro legal.
Now go back to the site you just created. Edit the home page to read {workspace.sampleSearch ()}.
Testing
Let's go back to the Manila site you set up search prefs for, back at the top of this HowTo. Click Edit this Page for any story, then click the Submit button.
Your Manila site should have sent the contents of the story to the search engine for indexing. So: go back to the search engine server. Jump to config.mainResponder.data.searchQueue. There should be at least one entry there. If you expand the table you can see what your Manila site sent to the search engine server.
You can go ahead and index that page right now. From the Server menu in Frontier, choose Search Engine->Index Stored Pages. That should cause all the pages stored in config.mainResponder.data.searchQueue to get indexed.
Indexing normally occurs every hour, automatically, but you can force an index whenever you like.
Now, in your browser, go to the site you set up on your search engine. The home page should display a small form with a search button. Try running a search in your browser. It should look much like this page, which is built by the same macro you're using.
If it doesn't work, here's the first thing to check. In the Manila site that you want indexed, expand the #discussionGroup table, then expand the prefs table. The adrMsgReader item should be the address of the msgReader page for that Manila site.
Customizing your search page
You can choose the alternate color displayed in the search results by passing it in your call to workspace.sampleSearch. For instance, the sample search page linked to above is called this way: {workspace.sampleSearch ("lightblue")}.
You can also turn off display of site names in the search results, by calling the script like this: {workspace.sampleSearch ("beige", "false")}.
Running an initial index
You may have existing sites with lots of contents that you want to get in the search engine index. You can get these sites indexed with a fairly simple script, like this:
local (adrMessages = @myFirstSiteManilaWebsite.["#discussionGroup"].messages)

local (adrMsg)

for adrMsg in adrMessages

    manilaSuite.search.indexMessage (adrMsg)
The only thing to change for your site is the first line: adrMessages should be the address of the messages table for the discussion group storage for the site you want to index.
See Also
How Manila Communicates with a Search Engine describes what's happening behind the scenes.
Dr. Matt's page on the Search Engine has lots of good information, though not all of it is applicable to Manila. The second half of the page, that describes the server page, is applicable.
If you haven't used it before, here's a page on the Control Panel.


